Tutorial: Slide with Score, Player, and Ball
In this GMC tutorial we'll create a base slide for our game that includes the player score, ball number, and player number (when a multiplayer game is active).
Configure the Slide Player
In your MPF config for your base mode, set the following:
    slide_player:
        mode_base_started: base
This will trigger the slide with a file name base.tscn when the base mode starts.
Create a Base Slide
In the /modes/base folder of your project, create a slides folder and in that folder create a new scene (Create New > Scene). Set the Root Type to be MPFSlide and save the file as base.tscn
Open the slide in the editor and add a new Node of type Sprite2D. Name this node "background". In the Inspector panel, under Texture choose Quick Load and select a nice background image. Drag the corners of the image node until it fills the dimensions of the slide.
Add a Score
Add a new node of type MPFVariable, name it "score", drag the corners until it fills the full width of the slide, and move it down to the middle. In the Label > Text field enter "1,000,000" so you can visualize what the text will look like.
Lower in the Inspector panel, set Label > Horizontal Alignment to "Center". Expand Theme Overrides > Font Sizes and set the font size to be a large number, like 150px. Under Colors enable the Font Outline Color (the default black is fine), and under Constants set the Outline Size to 6. If you have a custom font you'd like to use, you can set that in the Fonts section.
You should now see "1,000,000" large in the middle of the slide. Go to the top of the Inspector panel and set the following values:
- Variable Type: Current Player
- Variable Name: score
- Comma Separate: enabled
- Min Digits: 2

You can now play the project, start MPF, and start a game. You'll see 00 appear at the beginning, and as you press keyboard inputs to score points, the score value will update automatically. Neat!
Add a Ball Number: Theme Variants
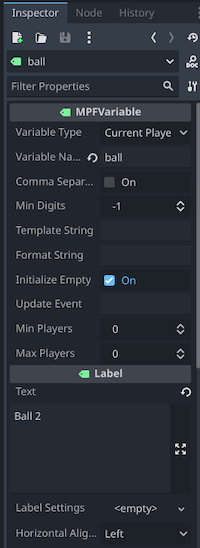
Add another MPFVariable node, name it "ball", and position it in the upper-left corner. In the Inspector panel set the following values:
- Variable Type: Current Player
- Variable Name: ball
- Template String: "Ball %s"
- Label > Text: "Ball 1"
Rather than setting the font details for this variable explicitly, we will create a Theme that can be re-used throughout the project. In the Inspector panel under Theme, click the dropdown that says <empty> and select New Theme. A theme icon will appear in the dropdown, click it again to open the Theme Editor at the bottom of the screen.
On the right side of the Theme Editor next to Type click the plus icon and add a Label type. The Font tab will open below, click the plus icon to enable a theme font and then click on <empty> and Quick Load to select a font file from your fonts folder. The next tab is for font size, click the plus icon to enable a size and set the value to 40px.
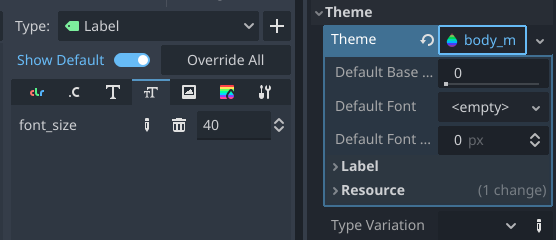
At the top of the Theme Editor select Save As... and save the theme in your fonts folder (or a theme folder if you'd prefer) with a name for the font style, e.g. body_md.tres. In the Inspector panel, you should see your ball number label now has the theme body_md.
Add a Player Number: Multiplayer-Only Variables
Create another MPFVariable like above, name it "player" set the Variable Name to number, then click the Theme <empty> dropdown and Quick Load to select the body_md.tres theme. Then set the following properties:
- Variable Type: Current Player
- Variable Name: number
- Template String: "Player %s "
- Min Players: 2
- Label > Text: "Player 1"
Note there are two extra spaces after the %s in the Template String, this is to create some extra space between the player and ball texts that only appears when the player text does. And the Min Players value means that the player text will only appear in a multiplayer game.
Dynamic Variable Positioning with Containers
When these variables appear onscreen, we want them to be left aligned and the player number to be first (if present), so we can use Godot's built-in layout tools to automatically position them. In the Scene panel create a new node of type HBoxContainer, which is a container that will lay its children from left-to-right. Drag the corners of the node so it starts in the upper left corner and is tall enough and wide enough to cover the player and ball text. In the Scene panel drag the player and ball nodes onto the HBoxContainer to make them children of that container, and make sure the player node is first (above) and the ball node is second (below).
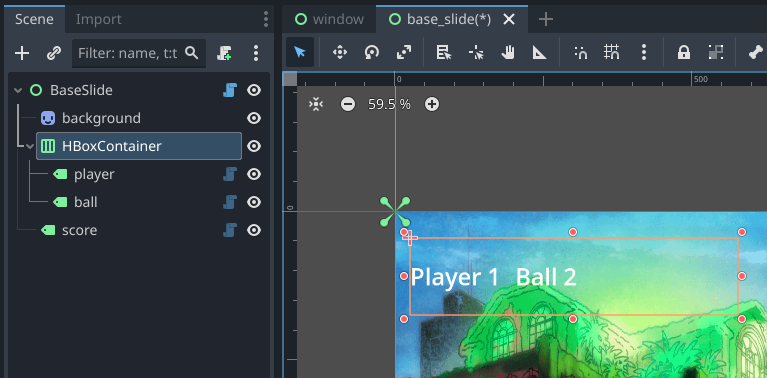
And that's it! You can start the project and run MPF to see it in action: the ball number will appear initially in the upper left corner, and when another player is added the player number will appear there and the ball number will shift to the right.
Something missing or wrong? You can fix it!
This website is edited by people like you! Is something wrong or missing? Is something out of date, or can you explain it better?
Please help us! You can fix it yourself and be an official "open source" contributor!
It's easy! See our Beginner's guide to editing the docs.
Page navigation via the keyboard: < >
You can navigate this site via the keyboard. There are two modes:
General navigation, when search is not focused:
- F , S , / : open search dialog
- P , , : go to previous page
- N , . : go to next page
While using the search function:
- Down , Up : select next / previous result
- Esc , Tab : close search
- Enter : go to highlighted page in the results