Tutorial 14: Add your first game mode
This is part of our Getting Started guide.
The guide starts here.
It's been awhile since this tutorial has been updated. If you find anything that is no longer relevant, please let us know, or better yet, edit or update it yourself!
By this point in the tutorial you should have a "playable" game, though it's pretty boring because there's no scoring, no modes, and the display just shows PLAYER X BALL X the whole time.
So in this step the real fun will begin as we configure our first game
mode! So far all of the configuration you've been doing has been
machine-wide configuration which was stored in the /config folder in
your game's machine folder.
All of the configuration options you added to the config.yaml applied
machine-wide.
In this step, we're going to add a /modes folder to your machine
folder. Then we'll add a subfolder for each game mode, and in each
we'll create a YAML config file that controls what happens in that
specific mode.
What's cool about MPF's modes system is that all of the configuration you do for a mode is only active when that mode is active. In fact from here on out, almost everything you configure will be at the mode-level rather than the machine-wide level. As we go deeper into the tutorial and the How To guides, you'll start to get a feel for what types of things should be in the machine-wide configuration versus the types of things that should be in mode-specific configurations. Pretty much all the hardware (coils, switches, lights, leds, ball devices, platform, DMD, etc.) are configured as machine-wide settings, and then game logic-type things (scoring, shots, sound effects, animations, light shows, etc.) are configured as mode-specific settings.
MPF can have as many modes running at once as you want. In fact you'll probably use this to your advantage, breaking up your game into lots of little modes to make the programming easier. (Many of these modes will not be "in your face" modes that the player is aware of. Things like skill shot, combo timers, super jet counters, etc., will all be configured as modes even though the player wouldn't think of them as modes.)
1. Read the documentation about modes
The first step to setting up a game mode is to understand how game modes work in MPF. So read that documentation now to get an overview, and then come back here for the step-by-step walk-through of doing your first mode.
2. Set up the folders & files for your "base" mode
The first mode we're going to create is a mode called "base." (Don't call it "game" because MPF has a built in mode called "game" that you don't want to overwrite.) This "base" mode will be running at all times while a game is in play and can be thought of as the "default" game mode. We'll set up default shots, scoring, configure the display to show the score, etc. Everything in the base game mode will be available if no other higher-priority modes are running. To create the base game mode:
- Create a folder called
modesin your machine's folder. - Create a subfolder for your
modesfolder calledbase. (You will ultimately create one subfolder for each mode you have, and the name of the folder controls the name of the mode.) - Inside your
basefolder, create a folder calledconfig. (This folder will hold your mode-specific config files.) - Inside your
configfolder, create a file calledbase.yaml. (This is the default config file for your base mode. We use the naming scheme<mode_name>.yamlinstead ofconfig.yamlfor these to make it easier to keep track of which files are which if you open a bunch of them at once in your editor.)
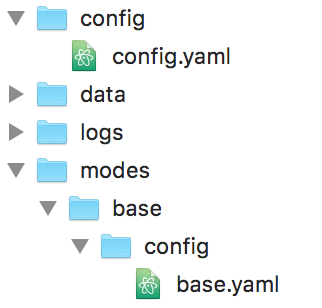
At this point your machine's folder & file structure should look like this:
3. Add your base game mode's settings to its config file
The settings that control a mode are configured in the mode's own configuration file. We do this because it allows modes to be completely self-contained. In other words, as long as you have a mode's folder and all its content, then you have everything you need for that mode.
So let's configure some settings for the base mode in the base mode's
config file. To do this, open your new mode's base.yaml in your code
editor. Add the config_version, then create a top-level configuration
section called mode:. On the next line, indent four spaces and add the
entry start_events: ball_starting. On the following line, also indent
four spaces and type priority: 100. Your base.yaml file should now
look like this:
##! mode: my_mode
#config_version=5
mode:
  start_events: ball_started
  priority: 100
There are lots more settings besides start_events and priority which
you can set for a mode. See mode:
for details.
The two settings we added here should be pretty obvious. The
start_events: ball_starting means that this mode will automatically
start when the MPF event ball_starting is posted. (In other words,
this mode will start whenever a ball starts.) You can also enter a list
of stop_events to control how the mode ends, though if you don't
enter one here then the mode will automatically stop when the ball ends,
so you don't have to specify a stop event now.
The priority: 100 means that everything this mode does will have a
base priority of 100. We'll create future modes at higher priorities so
they can take over the display, control lights, filter and block
scoring, etc. (You read the
documentation about modes, right?)
Also, when you create your own modes, keep them between 100 and 1,000,000. MPF has some built-in modes above and below those values that should stay at the top and bottom of the priority stack.
4. Add your mode to your machine-wide config file
Now that you have a mode set up, you need to go back to your machine-wide configuration file to add this new mode to the list of modes that your game will use. At first you might think this is a bit confusing. After all, you just created a folder and a config file for your new mode, so why do you have to specify that mode in another location too?
The reason is we don't want to automatically include a mode in a game just because that mode has a folder in the modes folder. (After all, what if you're testing something out, or if you have multiple versions of a mode you're playing with? It would be dangerous if MPF just automatically loaded every mode it found.)
So instead we built MPF so that you have to add all the modes you want
to be available in a game to a list in the machine-wide config file. To
do this, go back to your machine-wide config.yaml file (in
<your_machine>/config/config.yaml) and add a top-level section called
modes:. (Like all the sections in your config file, you can put this
section anywhere you want in your file. Maybe up towards the top so
it's easy to find later?) Then on the next line, type two spaces, then
a dash, then another space, then type base. So now that section of
your config.yaml should look like this:
modes:
  - base
Note that it's very important that you put dashes in front of each mode in this list? Why? Because with dashes, MPF will be able to combine settings together in this list from different config files.
For modes that's important, because MPF has several built-in modes it uses for its own things. (For example, "attract" and "game" are both modes, and we'll be creating future ones that you might want to use too for tilt, volume control, game statistics, high score entry, credits, etc.)
5. Run your game to verify your new mode works
Be sure to save the changes to base.yaml and config.yaml, and then
run your game again. For this test, you do not need to use verbose
logging since mode information is reported in the basic level of
logging. Once MPF is running, start a game and you should see something
like on the console and/or the log file when you run mpf both -t:
INFO : Mode.attract : Mode Starting. Priority: 10
INFO : SwitchController : <<<<< switch: s_start, State:1 >>>>>
INFO : SwitchController : <<<<< switch: s_start, State:0 >>>>>
INFO : Mode.game : Mode Starting. Priority: 20
INFO : Mode.game : Player added successfully. Total players: 1
INFO : Mode.base : Mode Starting. Priority: 100
INFO : SwitchController : <<<<< switch: s_trough_1, State:0 >>>>>
INFO : SwitchController : <<<<< switch: s_shooter_lane, State:1 >>>>>
INFO : SwitchController : <<<<< switch: s_shooter_lane, State:0 >>>>>
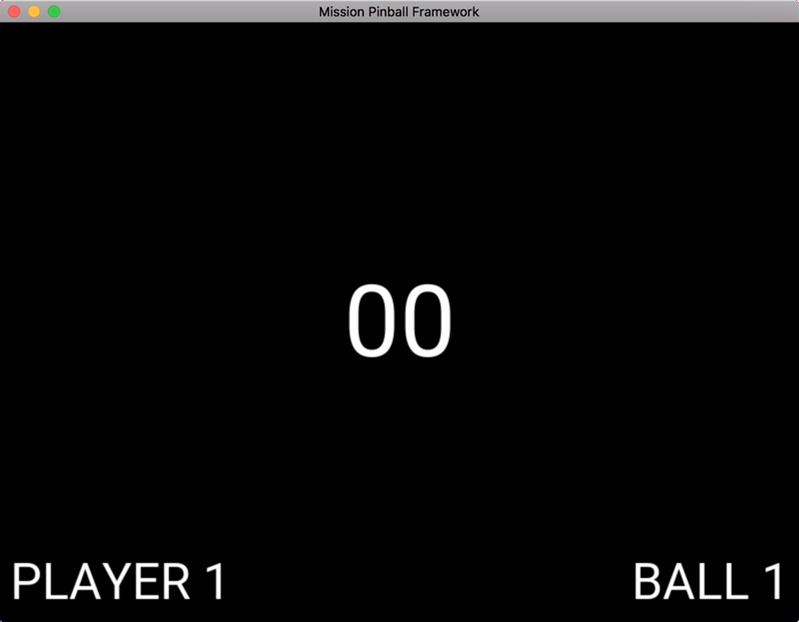
6. Make your base mode do something useful
We already mentioned that there are lots of different things you could add to your base mode. For now, let's configure the display so that it shows the player's score, as well as which player is up and what ball it is, like this:
To do this, go back to your base mode's config file
(<your_machine>/modes/base/config/base.yaml) and add a section called
slide_player:. Then add the following subsections so your complete
base.yaml looks like this:
##! mode: base
#config_version=5
mode:
  start_events: ball_starting
  priority: 100

slide_player:
  mode_base_started:
    widgets:
      - type: text
        text: (score)
        number_grouping: true
        min_digits: 2
        font_size: 100
      - type: text
        text: PLAYER (number)
        y: 10
        x: 10
        font_size: 50
        anchor_x: left
        anchor_y: bottom
      - type: text
        text: BALL (ball)
        y: 10
        x: right-10
        anchor_x: right
        anchor_y: bottom
        font_size: 50
##! test
#! start_game
#! assert_mode_running base
#! assert_text_on_top_slide "00"
#! assert_text_on_top_slide "PLAYER 1"
#! assert_text_on_top_slide "BALL 1"
We briefly touched on the slide_player: functionality earlier in this
tutorial and how you can configure it to show certain slides when
various MPF events happen.
Every time a mode starts in MPF, an event called
mode_(name)_started is posted. So
in this case, we set our slide player entry to play when it sees the
event mode_base_started which means it will play that slide as soon as
the base mode starts. (And since you configured your base mode to start
based on the ball_starting event, this means this slide will be
created and shown whenever a new ball is started.)
You may be wondering why we don't set that slide to play on the ball_starting event? The key to remember with game modes is that all the settings in your mode-specific config file are only active when the mode itself is active. In the case of our base mode, the ball_starting event is what actually causes the mode to start. When ball_starting is posted, the base mode starts and loads its configuration. At that point that ball_starting event has already happened, so if you set a slide to play within that mode then it will never play because it doesn't start watching for that event until after it happened. (Hopefully that makes sense?)
Anyway, if you look at the slide_player: settings, you'll see that
the slide that is shown when the event mode_base_started is posted
contains three text widgets. One that shows the score, one that shows
the player and one that shows the current ball number. Note that the
text: entries for those have have some words in parentheses.
Words in parenthesis signs are variables that are replaced in real time when they're updated. In this case these are "player variables" because they are values that belong to the current player. More on using dynamic text (that is, text that automatically updated itself as underlying values change), is here.
Also note that there are some additional positioning settings, like
x:, y:, anchor_x:, and anchor_y:. You can read about these in
our How to position widgets on slides guide.
Finally, note that the text widget showing the score has settings for
number_grouping: and min_digits:. You can read about what those do
in the
documentation for the text display widget.
7. Remove the old slide_player: ball_started entry
Now that you have this cool score display from your new base mode, you
can go into your machine-wide config.yaml and remove the slide_player:
entry for ball_started:. So now the slide_player: in your machine-wide
config.yaml should just look like this:
#! slides:
#!   welcome_slide:
#!     widgets:
#!       - type: text
#!         text: PINBALL!
#!         font_size: 50
#!         color: red
#!       - type: rectangle
#!         width: 240
#!         height: 60
#!   attract_started:
#!     widgets:
#!       - text: ATTRACT MODE
#!         type: text
slide_player:
  init_done: welcome_slide
  mode_attract_started: attract_started
##! test
#! advance_time_and_run .1
What if it didn't work?
- Make sure you actually start a game. Remember that this new base mode is only active when a ball starts from a game that's in progress, so you won't see the mode until a game starts. (If you're not able to start a game, check the troubleshooting tips in the previous step.)
- If you get some kind of crash or error, specifically any errors that mention anything about "config" or "path," double-check that you put all the files in the proper locations back in Step 2. (A common mistake is to put base.yaml in the /modes/base folder rather than the /modes/base/config folder.)
Check out the complete config.yaml file so far
If you want to see a complete config.yaml file up to this point, it's
in the mpf-examples/tutorial/step_14 folder.
You can run this file directly by switching to that folder and then running the following command:
C:\mpf-examples\tutorial_step_14>mpf both
Something missing or wrong? You can fix it!
This website is edited by people like you! Is something wrong or missing? Is something out of date, or can you explain it better?
Please help us! You can fix it yourself and be an official "open source" contributor!
It's easy! See our Beginner's guide to editing the docs.
Page navigation via the keyboard: < >
You can navigate this site via the keyboard. There are two modes:
General navigation, when search is not focused:
- F , S , / : open search dialog
- P , , : go to previous page
- N , . : go to next page
While using the search function:
- Down , Up : select next / previous result
- Esc , Tab : close search
- Enter : go to highlighted page in the results