How to give your on-screen window the DMD "dot look
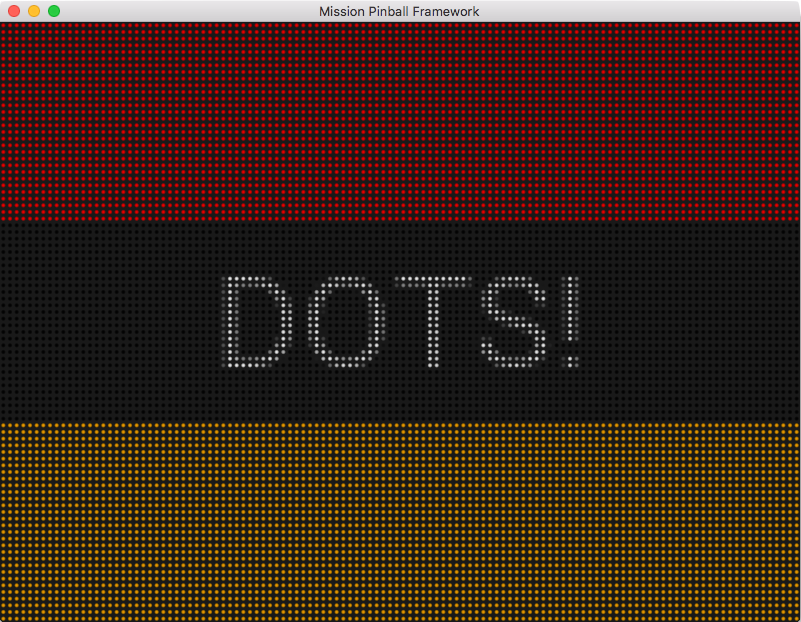
This guide will show you how to configure a full screen "dot look" display, like this:
The final sections of the machine config to make this happen are here:
displays:
  window:
    width: 800
    height: 600
  dmd:
    width: 120
    height: 90
    default: true
slides:
  window_slide:
    - type: display
      effects:
        - type: color_dmd
          dot_size: .5
      width: 800
      height: 600
  dmd_slide:
    - type: text
      text: DOTS!
    - type: rectangle
      width: 120
      height: 30
      color: orange
      y: 0
      anchor_y: bottom
    - type: rectangle
      width: 120
      height: 30
      color: red
      y: top
      anchor_y: top
slide_player:
  init_done:
    window_slide:
      target: window
    dmd_slide:
      target: dmd
##! test
#! advance_time_and_run .1
#! assert_slide_on_top window_slide window
#! assert_slide_on_top dmd_slide dmd
Let's step through this step-by-step.
1. Create your displays
To understand how this works, you have to understand the concepts of MPF displays and widgets.
What's actually happening under the hood is that you set up two MPF displays. The first is the "window", which is the display that represents your on-screen window. This should be set to the size of the screen window at the native resolution of the monitor or LCD where it's being shown.
displays:
  window:
    width: 800
    height: 600
  dmd:
    width: 120
    height: 90
    default: true
##! test
#! advance_time_and_run .1
In the example above, this is 800x600, but on your actual machine, it will probably be something like 1024x768, 1280x1024, 1600x1200, etc.
The second MPF display represents the virtual DMD itself, and you set that to the number of pixels (or dots) you want to be drawn in your window. In the example above, this is set to 120x90, meaning the virtual DMD is 120 dots wide and 90 dots tall. You can make this anything you want.
The key to remember is that the parent window will be using its pixels to draw the individual dots that make up the virtual DMD. So a smaller DMD resolution means the window has more pixels to use per-dot, resulting in a better overall image.
For example, if we zoom in on the 120x90 virtual DMD being shown on an 800x600 window, we'll see that it looks like this:
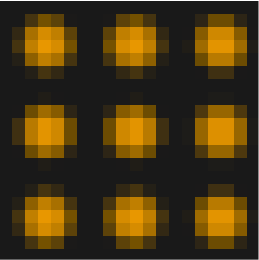
This works because there is about a 6x6 grid of pixels in the window for each virtual pixel in the DMD.
But if you increased the virtual DMD to 400x300 (instead of 120x90), that would mean you only had a 2x2 window area to render each pixel, and it wouldn't really work because you can't draw a circle with space around it in a 2x2 pixel.
Also note that we added default: yes to the dmd display, since as we
get deeper into the machine config, we want all the content (the
slide_player, etc.) to show up in the DMD display.
2. Create your window slide
Once you have your displays configured, the next step is to create the slide that will be shown in the window. In this case, the slide will only have a single widget, and that widget will be the Color DMD widget which will be used render the virtual DMD into the window.
slides:
  window_slide:
    - type: display
      effects:
        - type: color_dmd
          dot_size: .5
      width: 800
      height: 600
##! test
#! advance_time_and_run .001
We decided to name this slide "window_slide", though you can name it whatever you want.
Note that in this case, we set the width and height of the color_dmd widget so that it's the same size as the window itself. This is what causes it to be scaled to the full size of the window.
We do not set the number of dots in the DMD here, as that's automatically pulled in from the dmd display setting.
We also do not need to set a source display for the color_dmd widget since it will automatically use a display called "dmd".
3. Create your DMD slide
Next, we need a slide to show in the DMD itself. This is just something we're setting up here as an example "first slide". In your actual game, this slide will be ever changing and will reflect what's happening in your machine.
We're calling our first slide "dmd_slide":
slides:
  dmd_slide:
    - type: text
      text: DOTS!
    - type: rectangle
      width: 120
      height: 30
      color: orange
      y: 0
      anchor_y: bottom
    - type: rectangle
      width: 120
      height: 30
      color: red
      y: top
      anchor_y: top
##! test
#! advance_time_and_run .1
There's nothing special about this slide. We just added a text widget and two colored rectangles.
4. Configure your slides to show up
Finally, we need to create a slide_player entry which will cause the two slides we just created to be shown. In this example, we're using the init_done event since that's the event that's posted by the media controller once it's been initialized and ready to go.
#! displays:
#!   window:
#!     width: 800
#!     height: 600
#!   dmd:
#!     width: 120
#!     height: 90
#!     default: true
#! slides:
#!   window_slide:
#!     - type: display
#!       effects:
#!         - type: color_dmd
#!           dot_size: .5
#!       width: 800
#!       height: 600
#!   dmd_slide:
#!     - type: text
#!       text: DOTS!
#!     - type: rectangle
#!       width: 120
#!       height: 30
#!       color: orange
#!       y: 0
#!       anchor_y: bottom
#!     - type: rectangle
#!       width: 120
#!       height: 30
#!       color: red
#!       y: top
#!       anchor_y: top
slide_player:
  init_done:
    window_slide:
      target: window
    dmd_slide:
      target: dmd
##! test
#! advance_time_and_run .1
#! assert_slide_on_top window_slide window
#! assert_slide_on_top dmd_slide dmd
Since the DMD display is configured to be the default, when you use the
slide_player in the rest of your game, you won't have to specify
target: dmd. We just included it here to make it clear that we were
targeting the window slide to the window display and the dmd slide to
the dmd display.
5. Other options & positioning your DMD
Finally, remember to check the documentation for the display widget and the color_dmd effect for a full list of the options you can use to fine-tune how the DMD looks in the window. For example, you can configure the pixel size, the glow radius, the color of the space between the pixels, gain, tint, etc.
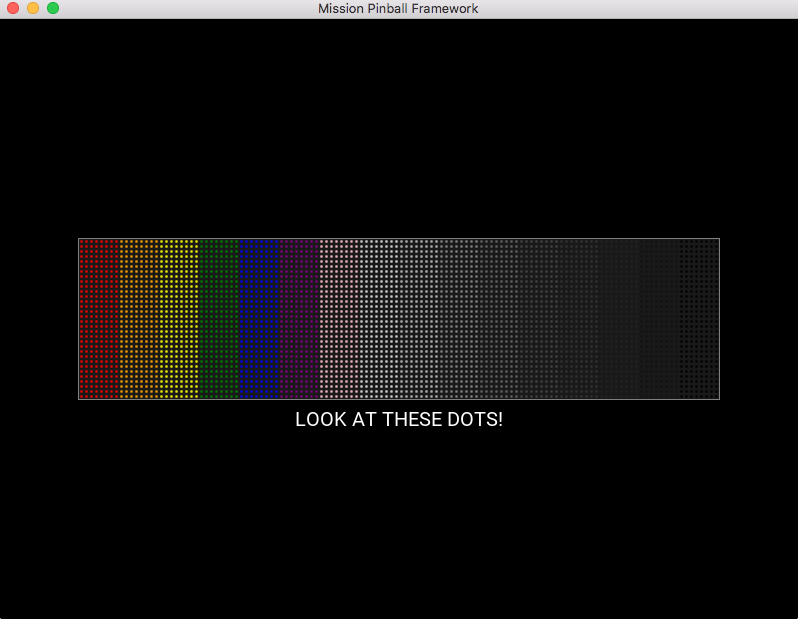
Also, you don't have to make the virtual DMD be the full size of the display. For example, if you set your dmd display to be 128x32 and then set the color_dmd widget to be 640x160, you'll get a display like this:
You can also use the widget sizing and positioning to create a DMD widget that is pre-positioned at a certain spot on the display. This is useful if you have a standard size LCD monitor in your backbox but only part of it is visible to the player. In that case you could make a color_dmd widget that was the size of the viewable area and use the widget positioning settings to align it to the area of the display that was visible.
You can also use the various window: options (such as full screen) to properly align the content of the display with the visible area.
Finally, even though this example was using the color_dmd widget, you could replace it with the display widget with a dmd effect for a single color look instead of full color.
Something missing or wrong? You can fix it!
This website is edited by people like you! Is something wrong or missing? Is something out of date, or can you explain it better?
Please help us! You can fix it yourself and be an official "open source" contributor!
It's easy! See our Beginner's guide to editing the docs.
Page navigation via the keyboard: < >
You can navigate this site via the keyboard. There are two modes:
General navigation, when search is not focused:
- F , S , / : open search dialog
- P , , : go to previous page
- N , . : go to next page
While using the search function:
- Down , Up : select next / previous result
- Esc , Tab : close search
- Enter : go to highlighted page in the results