Tutorial 16: Create an attract mode display show
This is part of our Getting Started guide.
The guide starts here.
It's been awhile since this tutorial has been updated. If you find anything that is no longer relevant, please let us know, or better yet, edit or update it yourself!
Now that we have a running game and some basic scoring, let's continue to make the display more useful by creating a slide show that plays during the attract mode and cycles through a few different slides. ("GAME OVER", "PRESS START", ... that sort of thing.)
1. Create an attract mode folder structure
So far it looks like your game only has one mode. (The base mode you created a few steps ago.) But MPF actually has a few built-in modes that it uses to do its thing. For example, there's a mode called "attract" which runs the attract mode (including watching for the start button press to start a game), and there's a mode called "game" which actually runs your games. (You may have noticed these modes in your logs. Attract runs at priority 10 and game runs at priority 20.)
Even though the attract mode is built-in, you can still create an attract mode folder and an attract mode config which enable you to extend the attract mode for your own use. So let's do that now.
Go into your machine's /modes folder (which should only have your
base folder in it) and create a new folder called attract. Now you
should see two folders in your machine's /modes folder, the base
folder and the attract folder.
Now create a /config folder in your attract folder, and then create a
new config file called attract.yaml. So the attract folder is pretty
much just like the base folder, with the file attract.yaml used to
control the settings that will be used when the attract mode is active.
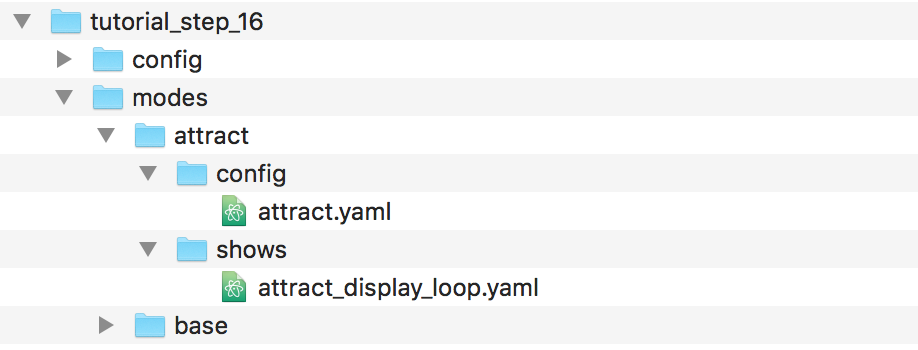
Finally, create a folder called /shows in your new attract mode
folder, and inside that folder, create a new file called
attract_display_loop.yaml.
Your new machine folder structure should look like this:
2. Edit your show yaml file
MPF has the ability to run "shows" which are coordinated series of
lights, sounds, slides, flashers, images, videos, etc. These show files
also use the .yaml file format, though they're different than the
yaml config files. You can name the show whatever you want. In this case
we called it attract_display_loop.yaml since that pretty much
describes what it does.
Note that we put this show file in a folder called "shows" in our
attract mode folder. Technically you can play any show from any mode
(and you could add a machine-wide /shows folder if you want), but we
prefer to add the shows used by a mode inside that mode's /shows
folder since it keeps everything from one mode together.
Here's a complete sample attract_display_loop.yaml file you can use
as a starting point:
#show_version=5
##! show: attract_display_loop

- duration: 3s
  slides:
    awesome_slide:
      widgets:
      - type: text
        text: YOU ARE AWESOME
        font_size: 50
      transition:
        type: push
        duration: 1s
        direction: left

- duration: 3s
  slides:
    press_start:
      widgets:
      - type: Text
        text: PRESS START
        animations:
          pre_show_slide:
          - property: opacity
            value: 0
            duration: .5s
          - property: opacity
            value: 1
            duration: .5s
            repeat: false
      - type: Text
        text: FREE PLAY
        color: green
        y: 10
        anchor_y: bottom
      transition:
        type: move_in
        duration: 1s
        direction: right

- duration: 3
  slides:
    mission_pinball:
      widgets:
      - type: Text
        text: MISSION PINBALL
        color: red
      transition:
        type: move_in
        duration: 1s
        direction: top

- duration: 3
  slides:
    last_game_score_slide:
      widgets:
      - type: text
        text: LAST GAME
        font_size: 50
        y: 60%
      - type: text
        text: (machine|player1_score)
        number_grouping: true
        min_digits: 2
        font_size: 50
        y: 40%

##! mode: attract
#! show_player:
#!   mode_attract_started: attract_display_loop
##! test
#! assert_text_on_top_slide "YOU ARE AWESOME"
#! advance_time_and_run 3
#! assert_text_on_top_slide "PRESS START"
#! assert_text_on_top_slide "FREE PLAY"
#! advance_time_and_run 3
#! assert_text_on_top_slide "MISSION PINBALL"
#! advance_time_and_run 3
#! assert_text_on_top_slide "LAST GAME"
First, notice the first line is #show_version=5. This is similar to
the config_version in config files, except since this is a show file,
it's "show_version".
Next, notice that the show file is broken into steps, each beginning
with a dash and then a duration: entry. The duration: entry controls
how long each step is. The default unit for this value is seconds, so
duration: 3 is valid, though you can enter standard time strings like
duration: 3s or duration: 300ms, etc.
By the way, when you play back a show, you can set the playback speed. So even though all the steps are 3 seconds long in our example show, when you play the show, you could (for example), set the playback speed to 2.0, and each step would be 1.5 seconds instead of 3 (since it's playing 2x as fast).
There's a whole section of documentation on shows, so review that at some point for all sorts of details about show files, formats, etc.
In addition to the duration: setting in each step, also notice that
each step has a slides: setting. The format and content of the
slides: section of a show is identical to the slide_player: section
in a config file. (In the future you'll see this applies to other
"players"; for example, light_player: in a config file is the same
as lights: in a show, sound_player: in a config file is the same as
sounds: in a show, etc.)
Then in the slides: section of each step, we've added a slide name.
These slides are named awesome_slide, press_start,
mission_pinball, and last_game_score_slide in the example above. The
slide names don't really matter, but since none of these slides have
been defined yet, we add a widgets: section to each one and define
them here. (The slides are only created once, the first time they're
displayed. After that they are kept in memory so they can be used over
and over. They're only removed from memory when the attract mode
stops.)
Also notice that we added transition: settings which control how one
slide transitions to the next. Without transitions, the new slide
appears instantly. But with transitions, we can make one slide move in
from the side, or cross fade, etc.
The last slide deserves special mention - it displays the score of the previous game. Player variables such as score are only valid during a game and lose their value once the game ends. To allow access to the score of a previous game, MPF saves this player variable to a machine variable which can be accessed outside the running game. A discussion of this and other machine variables is found here.
3. Configure your show to play automatically
Now that you've created your show, we need to make it so it plays. In
this case we want this show to play whenever the attract mode is
running. To do this, go back to the config file for the attract mode (
<your_machine>/modes/attract/config/attract.yaml) and add the
following:
#config_version=5
##! show: attract_display_loop
#! - duration: .1
#!   events: ok_super
##! mode: attract

show_player:
  mode_attract_started: attract_display_loop
##! test
#! mock_event ok_super
#! advance_time_and_run .1
#! assert_event_called ok_super
Note that we don't need a mode: section here because those settings
are already configured in the default attract mode settings folder
contained inside of MPF. So instead all we need to do is add a
show_player: entry. Like the slide_player: we've used in the past,
the show_player: section contains sub-sections for MPF events, and
when that event is posted the shows underneath it are started.
In this case we're going to start the show when the mode_attract_started event is posted.
You can also use the show_player: section of a config to set events
that stop shows, but shows that are started from modes automatically
stop when that mode stops. (The beauty of mode-based configs!) So in
this case, the attract_display_loop will automatically stop when the
attract mode stops (which it does when a game starts).
4. Remove the attract mode stuff from your machine config
One last thing you should do here while you're at it is go back into
the machine-wide config <your_machine>/config/config.yaml and remove
the attract_started slide from the slides: section, and the
mode_attract_started entry from your slide_player: section.
OLD machine-wide config (partial):
# old
slides:
  welcome_slide:
    widgets:
      - type: text
        text: PINBALL!
        font_size: 50
        color: red
      - type: rectangle
        width: 240
        height: 60
  attract_started:
    widgets:
      - text: ATTRACT MODE
        type: text

slide_player:
  init_done: welcome_slide
  mode_attract_started: attract_started
##! test
#! assert_slide_on_top attract_started
NEW machine-wide config:
slides:
  welcome_slide:
    widgets:
      - type: text
        text: PINBALL!
        font_size: 50
        color: red
      - type: rectangle
        width: 240
        height: 60

slide_player:
  init_done: welcome_slide
##! test
#! assert_slide_on_top welcome_slide
The reason we remove this is because it's not necessary now that we have our new attract mode display show running.
Plus, even if you don't remove this entry, the original "ATTRACT MODE" text from the machine-wide config won't show up anymore. Why? Because the attract mode runs at Priority 10, and the machine-wide config is Priority 0. So the display show from the attract mode config will show on top of the slide from the machine-wide config, so we may as well remove the machine-wide one.
Now when you run your game via mpf both, you should see the attract
mode display show. Then when you press Start (or the S key),
everything else should proceed as it did before.
If you play through a complete game (3 balls), then when the game is over, you should see the attract mode display show start up again.
Check out the complete config.yaml file so far
If you want to see a complete config.yaml file up to this point, it's
in the mpf-examples/tutorial/step_16 folder. You can run it be
switching to that folder and running mpf both:
C:\mpf-examples\tutorial_step_16>mpf both
Something missing or wrong? You can fix it!
This website is edited by people like you! Is something wrong or missing? Is something out of date, or can you explain it better?
Please help us! You can fix it yourself and be an official "open source" contributor!
It's easy! See our Beginner's guide to editing the docs.
Page navigation via the keyboard: < >
You can navigate this site via the keyboard. There are two modes:
General navigation, when search is not focused:
- F , S , / : open search dialog
- P , , : go to previous page
- N , . : go to next page
While using the search function:
- Down , Up : select next / previous result
- Esc , Tab : close search
- Enter : go to highlighted page in the results