Connecting a System1/80 Machine to LISY1/80
1. Replace your original MPU with LISY1/80.
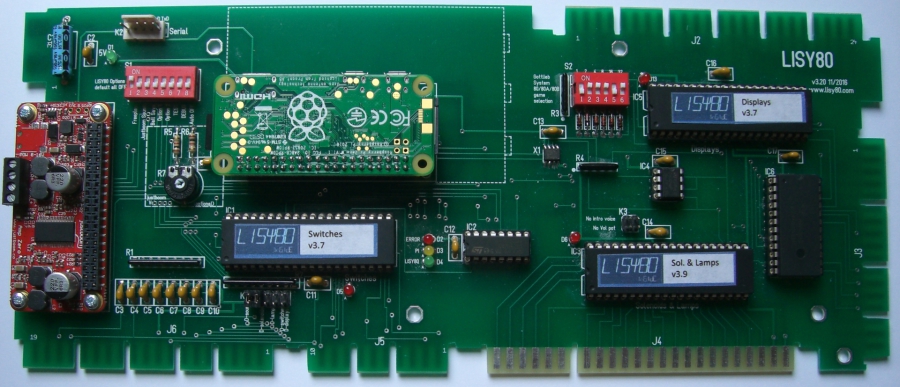
For Gottlieb System80/80A/80B games, replace the existing Gottlieb CPU with the "LISY80" board. For System 1 machines, replace the existing Gottlieb CPU board with the "LISY1" board.
Note
See documentation at www.lisy80.com for details. Basically you replace the MPU with the LISY board. You can still play the original ROM using PinMAME on LISY.
More details can be found in the LISY user manual.
2. Configure LISY to Run MPF
There are two ways this can be done:
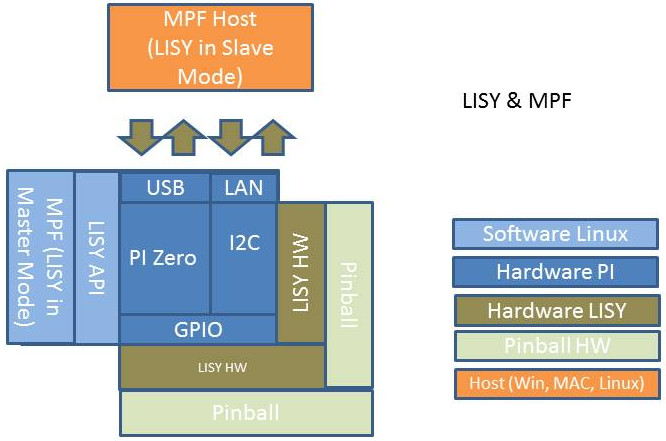
a. Run MPF on a standalone PC which connects to the LISY hardware operating in "slave" mode via Ethernet, WiFi, or serial. This is generally recommended during development since it's easier to work on your MPF config using your own computer. You can also use this configuration if you want to add an LCD or DMD to the older Gottlieb machine. b. Run MPF on the LISY hardware directly ("master" mode). (Technically MPF is running on the LISY controller's Raspberry Pi Zero.) This option is nice when your game is finished and you no longer want to connect a PC. Note that the Raspberry Pi on the LISY is not powerful enough to run the MPF media controller, so this option is really only valid for simpler, segment display type games. If you want to run a full LCD or DMD, then just run MPF on a separate computer (which can still be small and inside your machine) and connect to the LISY controller via Option (a) above.
See the following image for an architecture overview:
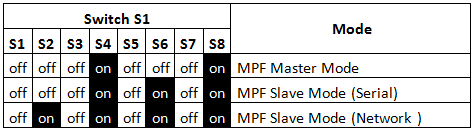
If you want to run MPF on the LISY controller itself, set DIP 4 (option1) and DIP 8 (autostart) to 'ON' and all other DIPs on that switch to 'OFF'. This will configure the LISY board to boot to MPF instead of the default PinMAME.
If you want to use the LISY board in "slave" mode where you run MPF on a separate computer and remotely control the LISY board, set DIP 6 to 'ON'. Then to control the mode that the LISY board will communicate with the host PC running MPF, set DIP 2 to 'ON' for network mode or 'OFF' for serial mode.
Note
If you are using a USB connection you have also to disconnect it in order to be able to reboot, as it will power the Raspberry Pi over the USB connection.
3. Configure your Game
As usual, configure your specific Game Hardware via Switch 'S2'. For instance, for Devils Dare, which is internal number '18', set S2 DIP 2 and DIP 5 to 'ON' and all others to 'OFF' (binary coding of decimal 18).
A list of all game numbers is included in the LISY user manual.
4a. Add MPF config to SD Card (only needed for MPF Master Mode)
If you're using the "master" mode where MPF runs on the LISY board itself, you need to get your MPF config installed onto the LISY board. You can do this via the SD card.
Place your MPF config in the folder /boot/mpfcfg/lisyx/yyy/ on the SD
Card (replace "y" with 1 for LISY1 and with "80" for LISY80. Replace
"xxx" with your game number with leading zeros if it's shorter than
three digits). For instance with Dare Devil, the game would be at
/boot/mpfcfg/LISY80/018/ on the SD card.
It's easiest to do this with an SD card reader on your computer, though you could also copy the files using SSH connected to a running LISY controller (see the LISY user manual for details).
Again, we only recommend this option for your "final" config, as it's much easier to use the LISY board in slave mode and run MPF off your computer while you're developing your game.
Warning
This mode of operation will not allow you to run the MPF-MC since the LISY's Raspberry Pi Zero is not powerful enough. If you want to add an LCD or DMD to your machine, use the slave option detailed below.
4b. Connect your PC running MPF to LISY via network or serial (only needed for MPF Slave Mode)
If you're using the "slave" mode where you run MPF on a standalone computer and then connect to the LISY board via the network or serial, once you configure the LISY board's DIP switches from Step 2 then you need to update your machine config file for MPF running on your computer to be able to connect to the LISY board.
Serial mode
If you want to use the serial port, add/update the following sections in your machine config:
hardware:
  platform: lisy
lisy:
  connection: serial
  port: com1               # replace this with your com port
  baud: 115200
Connection to LISY can be made via IP or via direct USB connection. For
the USB connection no special driver Software nor a special USB cable is
needed, a "normal" USB charging cable (Micro-USB cable) will do the
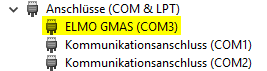
job. Once connected to the host computer, it will (hopefully) identify a
new serial device. This is usually COMX on windows:
Or /dev/ttyACMX on Linux:
dmesg

usb 1-3: new high-speed USB device number 11 using ehci-pci
usb 1-3: New USB device found, idVendor=0525, idProduct=a4a7
usb 1-3: New USB device strings: Mfr=1, Product=2, SerialNumber=0
usb 1-3: Product: Gadget Serial v2.4
usb 1-3: Manufacturer: Linux 4.4.50+ with 20980000.usb
cdc_acm 1-3:2.0: ttyACM0: USB ACM device
usbcore: registered new interface driver cdc_acm
cdc_acm: USB Abstract Control Model driver for USB modems and ISDN adapters
Network mode
Alternatively, if you want to connect using WiFi or Ethernet, add/update the following sections in your machine config:
hardware:
  platform: lisy
lisy:
  connection: network
  network_port: 5963
  network_host: a.b.c.d    # replace this with the IP of LISY
LISY is configured to get its IP address by DHCP, the default hostname
is lisy. For WLAN your WLAN-SSID and password can be put into a text
file on the SD-card (see the LISY user
manual for details).
LISY will show the IP address on the first two displays of the pinball
during boot time (or "NO IP" if no IP address could be found).
5. Power up LISY
Power up your system and enjoy.
5a. Start MPF (only needed for MPF Slave Mode)
Start MPF on you PC. Optionally start MPF-MC (if you want to use an additional DMD or LCD).
What if it did not work?
Have a look at our LISY troubleshooting guide.
Something missing or wrong? You can fix it!
This website is edited by people like you! Is something wrong or missing? Is something out of date, or can you explain it better?
Please help us! You can fix it yourself and be an official "open source" contributor!
It's easy! See our Beginner's guide to editing the docs.
Page navigation via the keyboard: < >
You can navigate this site via the keyboard. There are two modes:
General navigation, when search is not focused:
- F , S , / : open search dialog
- P , , : go to previous page
- N , . : go to next page
While using the search function:
- Down , Up : select next / previous result
- Esc , Tab : close search
- Enter : go to highlighted page in the results