How to configure mono/traditional DMD (P-ROC)
Related Config File Sections:
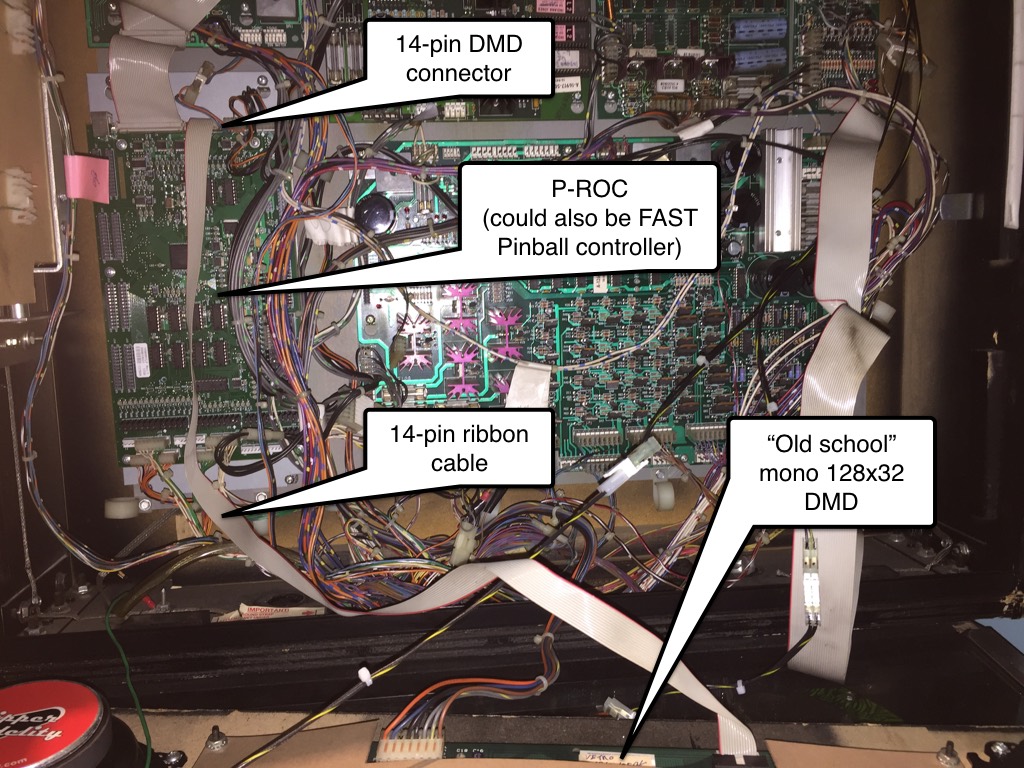
The P-ROC can drive a traditional single-color pinball DMD via the 14-pin DMD connector cable that's been in most pinball machines for the past 25 years, like this:
Note
If you want to drive an RGB LED DMD and you're using a P-ROC, you can do that by adding a SmartMatrix or RGB.DMD board which you would then use in place of the P-ROC's 14-pin DMD connector.
1. Connect your hardware
2. Add a physical DMD device entry
Once you have your hardware and port set, you need to create the actual device entry for the DMD.
You do this in the dmds: section of the machine config. This section
is like the other common sections (switches, coils, etc.) where you
enter the name(s) of your device(s), and then under each one, you enter
its settings.
(And yes, in case you're wondering, it's possible to have more than one physical DMD.)
To do this, create a section in your machine-wide config called dmds:,
and then pick a name for the DMD, like this:
dmds:
  my_dmd:
    shades: 16
You need to have at least one setting for this to be a valid YAML file,
so we usually just pick the shades and add that with a value of 16
(which means the DMD runs will convert the display content to 16 mono
shades when it displays it).
The "shades" option is how many brightness shades you want. 1990s WPC machines supported 4 shades, and modern Stern DMD machines support 16. The P-ROC supports 16 shades (even on older 1990s plasma DMDs). Most modern games will probably be 16 shades, but you can do 4 (or even 2) if you want an old school look.
There are lots more options for the physical_dmd: section than just the "shades" option listed here. Check the dmds: for a list of all the options.
Note that one option you do NOT have for physical DMDs is the color. That's because the color of the DMD is determined by the DMD itself. You don't actually send it color values, rather, you just send it brightness levels, and the DMD shows those brightness levels with whatever color the DMD is.
3. Set a source display
Now that you have everything configured, the last step is to make sure the DMD knows what content to show. In MPF, you do this by mapping a physical DMD to an MPF display.
By default, the DMD will look for a display (in your
displays: section called "dmd".
However you can override this and configure the DMD to use whatever
logical display you want by setting a source_display: setting. (Just
make sure that the width and height of your source display match the
physical pixel dimensions of the DMD or else it will be weird.)
4. Setting the DMD update rate
By default, MPF will send new DMD frames to the P-ROC at about 30 frames per second. (Technically it sends a new frame every 33ms.)
5. Fine tuning the DMD timing cycles
The P-ROC is able to drive a traditional DMD with 16 shades of intensity, ranging from off (0) to full on (15). Note that the P-ROC doesn't control (or even know) what color the DMD is as that's dictated by the DMD itself.
The P-ROC creates the appearance of 16 levels of brightness by rapidly turning individual dots on and off.
For years, DMD's have been high-voltage gas plasma displays, though more recently they're LED-based (even the single color ones with the 14-pin connectors).
Some people have reported less-than-optimal quality when using a P-ROC with certain types of DMDs. To address this, the P-ROC allows you to fine-tune the timings of the individual bit planes that make up the image.
For details on this, you can search the P-ROC forums (now defunct) for
"high_cycles" to find a few threads where people are talking about
these settings. Then you can set them in the p_roc: dmd_timing_cycles:
section of your machine-wide config, like this:
p_roc:
  dmd_timing_cycles: 90, 190, 50, 377
Note that we do not have specific recommendations for values here and based on our experience, we haven't found a need to change this. However, if you do have issues and you get new values by talking to the P-ROC folks, this is how you adjust them in MPF.
Our recommendation is that you leave the dmd_timing_cycles: setting
out of your p_roc: config unless you need it and really know what
you're doing. (There's potential that bad values here could
permanently damage your DMD hardware, so again, only change these if you
know what you're doing.)
A final config you can test
At this point you're all set, and whatever slides and widgets are shown on the DMD's source display in MPF-MC should be shown on the physical DMD.
That said, all these options can be kind of confusing, so we created a
quick example config you can use to make sure you have yours set right.
(You can actually just save this config to config.yaml in a blank
machine folder and run it to see it in action which will verify that
you've got everything working properly.)
To run this sample config, you can either run mpf both.
When you run it, do not use the -x or -X options, because either of
those will tell MPF to not use physical hardware which means it won't
try to connect to the Teensy.
Note that the Using a traditional (single color) physical DMD guide has more details on the window and slide settings used in this machine config.
hardware:
platform: p_roc
p_roc:
driverboards: pdb
displays:
window: # on screen window
width: 600
height: 200
dmd: # source display for the DMD
width: 128
height: 32
default: true
window:
width: 600
height: 200
title: Mission Pinball Framework
source_display: window
dmds:
my_dmd:
brightness: 1.0
slides:
window_slide_1: # slide we'll show in the on-screen window
- type: display
effects:
- type: dmd
dot_color: ff5500
width: 512
height: 128
- type: text
text: MISSION PINBALL FRAMEWORK
anchor_y: top
y: top-3
font_size: 30
- type: rectangle
width: 514
height: 130
color: 444444
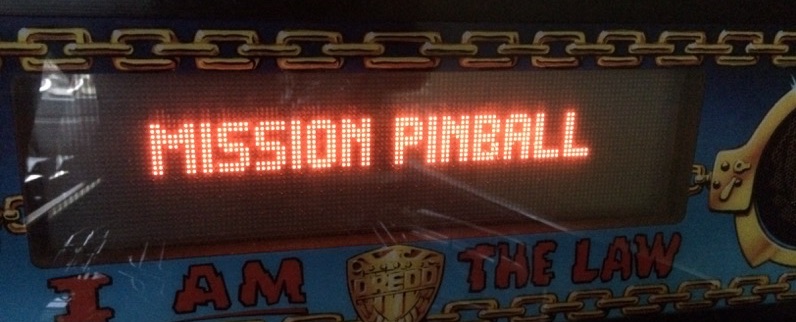
dmd_slide_1: # slide we'll show on the physical DMD
- type: text
text: IT WORKS!
font_size: 25
slide_player:
init_done:
window_slide_1:
target: window
dmd_slide_1:
target: dmd
##! test
#! assert_text_on_top_slide "MISSION PINBALL FRAMEWORK" window
#! assert_text_on_top_slide "IT WORKS!" dmd
What if it did not work?
Have a look at our troubleshooting guide for the P/P3-Roc.
Something missing or wrong? You can fix it!
This website is edited by people like you! Is something wrong or missing? Is something out of date, or can you explain it better?
Please help us! You can fix it yourself and be an official "open source" contributor!
It's easy! See our Beginner's guide to editing the docs.
Page navigation via the keyboard: < >
You can navigate this site via the keyboard. There are two modes:
General navigation, when search is not focused:
- F , S , / : open search dialog
- P , , : go to previous page
- N , . : go to next page
While using the search function:
- Down , Up : select next / previous result
- Esc , Tab : close search
- Enter : go to highlighted page in the results