Lights
Related Config File Sections:
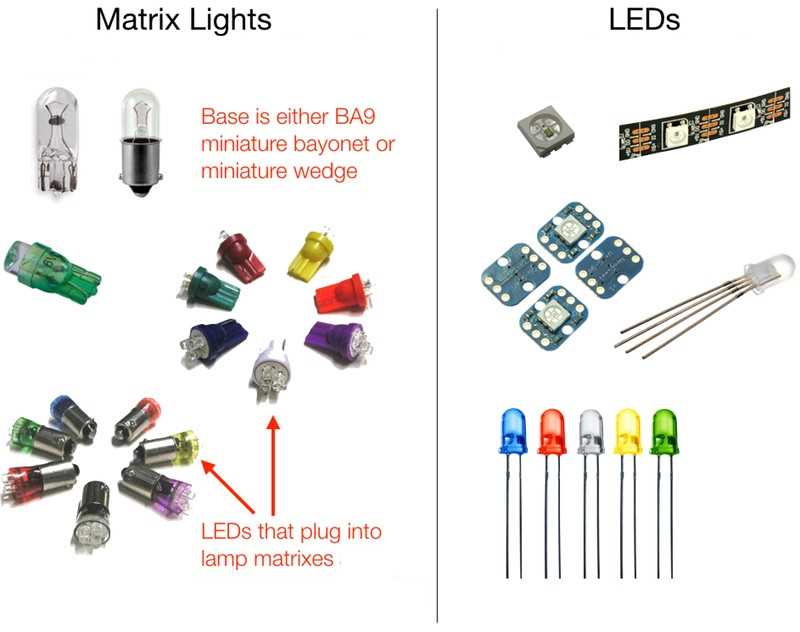
Since MPF 0.50 all LEDs, matrix lights and GIs are configured as lights:. See section Lights vsersus LEDs for details.
There are multiple types of lights (read those for specific details):
This is an example of for a light:
lights:
  my_led:
    number: 7   # the exact number format depends on your platform
For WS2812 LEDs use type grb (WS2811 does not need this)
lights:
  my_ws2812_led:
    number: 23  # the exact number format depends on your platform
    type: grb
You can also map individual color channels:
lights:
  rgb_led:
    type: rgb
    channels:
      red:
        number: 9-29     # the exact number format depends on your platform
      green:
        number: 9-30
      blue:
        number: 9-31
      white:
        number: 9-32
Starting with MPF 0.54 there is a new syntax to chain lights:
lights:
  led_0:
    start_channel: 0-0    # the exact number format depends on your platform
    subtype: led
    type: rgb    # will use red: 0-0, green: 0-1, blue: 0-2
  led_1:
    previous: led_0
    subtype: led
    type: rgbw   # will use red: 0-3, green: 0-4, blue: 0-5, white: 0-6
  led_2:
    previous: led_1
    subtype: led
    type: rgbw   # will use red: 0-7, green: 0-8, blue: 0-9, white: 0-10
If your light is connected to a driver use this example:
coils:
  light_connected_to_a_driver:
    number: 42          # number depends on your platform
    allow_enable: true  # this will allow 100% enable without pwm
lights:
  light_on_a_driver:
    number: light_connected_to_a_driver  # map this light to a driver
    platform: drivers
Fully working Example 1 - Basics
Let’s bring above informaton together and learn by example. Though the following example is a fully working minimal set for the Cobra controller, it is as well helpful to understand the concpet more if you use a different set of hardware. For this example to work physically, the Cobra board needs to have 5V power supply and a Neopixel strip connected to NEO0. No need for a high voltage power supply like you need for coils. The example has been built for a WS2811 strip, but can be used as well for a WS2812 strips and others. This config.yaml is the only configuration file you need in your project. The config file is fully valid for the Cobra board connected to a Linux PC running MPF. If you have a Cobra board but run Windows or macOS you have to change the ports. If you run a completely different hardware you have to adapt the hardware section.
#config_version=5

hardware:               # change in case you don't use OPP
   platform: opp
   driverboards: gen2

opp:
   ports: /dev/ttyACM0, /dev/ttyACM1 # change if your Cobra board uses different ports

lights:
   led_strip_0_led_1:
      number: 0-0-1 # the exact number format depends on your platform
      subtype: led
      type: rgb
      tags: group1
   led_strip_0_led_2:
      number: 0-0-2 # the exact number format depends on your platform
      subtype: led
      type: rgb
      tags: group1
   led_strip_0_led_3:
      previous: led_strip_0_led_2
      subtype: led
      type: rgb
      tags: group1

light_player:
   led_code:
      led_strip_0_led_1: DFFF00
   led_off:
      led_strip_0_led_1: off
      led_strip_0_led_2: off
      led_strip_0_led_3: off
   led_name:
      led_strip_0_led_1: LightSalmon
   group_light:
      group1: green
   led_fade:
      led_strip_0_led_1:
        color: slateblue
        fade: 2000ms

keyboard:
   1:
     event: led_off
   2:
     event: led_code
   3:
     event: led_name
   4:
     event: group_light
   5:
     event: led_fade
When you run this configuration, you can use the keys 1 - 5 to set certain lights. Each key submits one event. That event is being used in the light_player section. Each event in the light_player section is assigned to an LED (or group of LEDs), these LEDs are defined in the lights section of the config file. In the light_player section each LED is assigned to a color. For the colors you can use:
- off: to switch an led off
- hex code: e.g. DFFF00 to define each color channel, here red=DF, green=FF, blue=00. Note that the code has no leading # since that would be a comment in your config file
- html name: e.g. LightSalmon, you can check the available names here https://htmlcolorcodes.com/color-names/ Capitalization doesn’t matter in the config file, e.g. LightSalmon or lightsalmon are equally good
In the light_player section you can either define the color as value
of the specified LED, which turns that LED immediately to the given
color. Or you can specifiy a color and a fade value, then the color
will transition to the new value in the specified time. In the config
file this is configured for key 5, see led_fade in the light_player
section.
In the light_player section after each event you can specify one or
multiple lights. In the section led_off both LEDs are specified, hence
both are turned off when the event led_off is sent.
Note that the defined lights have tags, here the tag value is group1.
In the light_player section you can either address a single LED by its
name or you can use a group name to address all LEDs in that group. When
you press key 4 then LED 1, 2, and 3 are switched to green. A few notes
on above example:
- It is kept as simple as possible to learn by example.
- Keep in mind that numbering starts with 0, so LED 1 and 2 in above config are your 2nd and 3rd LED of the strip
- If you use a WS2812 strip then the green and red channel are
swapped. Which means that if you see a red light when pressing
button 4, then you have a WS2812 strip. In order to get this fixed
change the type value in the config file from
rgbtogrb. - After you run that example and understand how it works, then change
the type of
led_strip_0_led_2toggg. Now run the setup again and press key 4. The first LED will still show green, but the second LED will show white. That is because you told the configuration that that LED has only green channels so it turns all of them on when you want to show green, but in fact the other channels show red and blue. Depending on what you do, this might be helpful to know. - The above example uses NEO0 of the Cobra controller, if you want to use NEO1 you have to change the number value in the lights section of your config file, the first 0 has to be a 1 in this case.
- Note that in the definition of
led_strip_0_led_3the hardware addess is not specified (unlike led_strip_0_1 and led_strip_0_2. Instead what is specified is what the previous LED is. That is handy in case you need to add a new LED somewhere in your chain. Instead of changing all hardware addresses you can just change the oneprevioustag.
Fully working Example 2 - light_stripes
From a hardware perspective the same remarks as in the example above are
true. This example will show a fully working example using the parameter
light_stripes (yes written with an e). The adavantage of this
paramater is that you are able to define a full serial LED light strip
with a few lines of config. See as well the corresponding config file
section light_stripes:
#config_version=5

hardware:
 platform: opp
 driverboards: gen2

opp:
 ports: /dev/ttyACM0, /dev/ttyACM1

light_stripes: #yes there is a spelling mistake, make the same mistake
 led_strip_0:
    number_start: 0
    count: 50
    number_template: 0-0-{}
    light_template:
       type: rgb
       tags: strip0

light_player:
 full_strip_on:
    strip0: DFFF00
 led_off:
    led_strip_0: off
 single_led_green:
    led_strip_0_light_5: green #led_strip_0 is the name of the strip

keyboard:
 1:
    event: led_off
 2:
    event: full_strip_on
 3:
    event: single_led_green
single_led_green to understand how to address a single light in your light strip.
Monitorable Properties
For dynamic values and conditional events, the prefix for lights is device.lights.(name).
- brightness: The numeric value of the brightness of this light, from 0-255.
- color: The current color.
Related How To guides
Something missing or wrong? You can fix it!
This website is edited by people like you! Is something wrong or missing? Is something out of date, or can you explain it better?
Please help us! You can fix it yourself and be an official "open source" contributor!
It's easy! See our Beginner's guide to editing the docs.
Page navigation via the keyboard: < >
You can navigate this site via the keyboard. There are two modes:
General navigation, when search is not focused:
- F , S , / : open search dialog
- P , , : go to previous page
- N , . : go to next page
While using the search function:
- Down , Up : select next / previous result
- Esc , Tab : close search
- Enter : go to highlighted page in the results