Using a traditional (single color) physical DMD
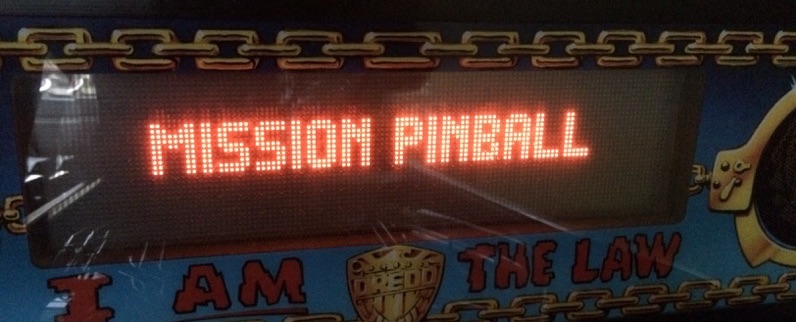
This guide will show you how to use a traditional, physical DMD with MPF, like this:
This is supported for all Monochome DMD platforms.
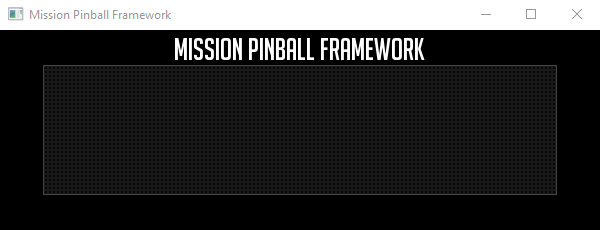
It will also show you how to create an on-screen popup window which will show the contents of the DMD, like this (with a blank DMD):
If you want to use a physical DMD without the on-screen equivalent, we'll show you how to do that at the end.
If you want to only have an on-screen DMD without the physical one, like if you want to replace the DMD with an LCD screen but still have it look like a DMD, then read this guide instead.
The final version of the relevant sections of your machine config for a physical DMD with an on screen window too will look like this:
1. Understand how physical, mono DMDs work
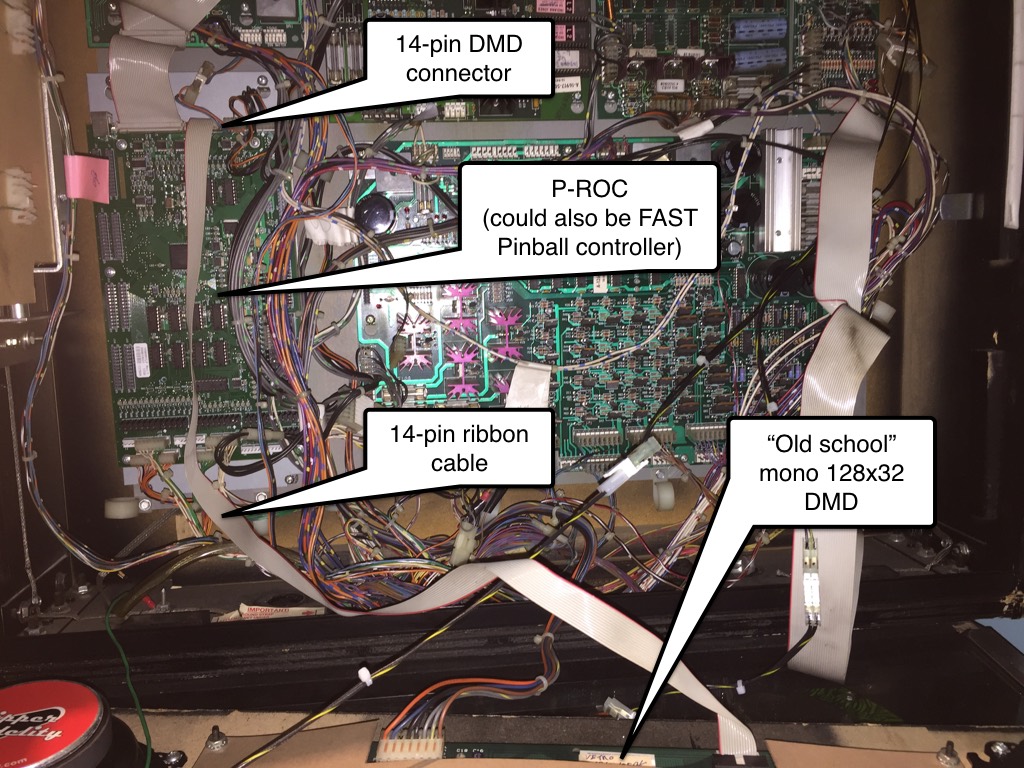
This guide explains how to config physical single-color (mono) DMDs. These are DMDs that are connected to your FAST Pinball or P-ROC controller via the 14-pin ribbon cable, like this:
It makes no difference whether you're using an LED or an original plasma gas DMD. (Also it doesn't matter what color it is.)
2. Add your displays to your MPF config
The first part of the config file above is where you create your logical displays like we covered in the Welcome to The Mission Pinball Framework! section.
displays:
  window:
    width: 600
    height: 200
  dmd:
    width: 128
    height: 32
    default: true
##! test
#! post show_slide_event
#! advance_time_and_run .1
We're creating two displays here. The first is called "window" and has a size of 600x200. This will be the display that shows up on the computer screen.
The second display, which we're calling "dmd", will be the display that provides the content for the physical DMD. This display is 128x32, which is the pixel size of the DMD.
Notice that we set default: true for the dmd display. This is because
as we're creating display content in our game, we want it (by default)
to show up in the DMD (since that will be the primary display in our
game).
Note that you don't set colors or anything here---this is just setting up the logical displays which we'll use next.
3. Add your window configuration
Next, we have a window: section which holds the settings for the
actual on screen window itself. In this case we're just configuring it
to be 800x600, with a window title of "Mission Pinball Framework".
window:
  width: 600
  height: 200
  title: Mission Pinball Framework
##! test
#! post show_slide_event
#! advance_time_and_run .1
Check out Step 2. of the LCD guide for more details on this window section, and be sure to check out all the window options in the window: section of the config file reference.
Notice that in this case, we did not add the source_display: window
setting to this section. That's because we have a logical display
called "window", and when you have that, the on-screen window will
automatically use that display as its source.
4. Configure a window slide to show the on screen DMD
Now we have a working on-screen window and a working physical RGB DMD.
But if you run mpf both now, your on screen window will be blank
because we haven't built any slides to show up.
So in this step, we're going to build a slide for the on-screen window that will be shown when MPF starts. We'll add some widgets to that slide to make it look like the screen shot at the beginning of this guide.
First, create a slides: section in your machine config (if you don't
have one already), and then create an entry for the slide that we want
to show. In this case, we've decided to name that slide
"window_slide_1". (Of course you can call this slide whatever you
want.)
slides:
  window_slide_1:
##! test
#! post show_slide_event
#! advance_time_and_run .1
Next we have to add some widgets to that slide. (Refer to the documentation on widgets if you're not familiar with widgets yet.)
The first widget will be a display widget with a dmd effect which is a widget which renders a logical display onto a slide in a way that makes it look like a DMD:
#! displays:
#!   window:
#!     width: 600
#!     height: 200
#!   dmd:
#!     width: 128
#!     height: 32
#!     default: true
slides:
  window_slide_1:
    - type: display
      effects:
        - type: dmd
          dot_color: ff5500
      width: 512
      height: 128
#! slide_player:
#!   show_slide_event:
#!     window_slide_1:
#!       target: window
##! test
#! post show_slide_event
#! advance_time_and_run .1
#! assert_slide_on_top window_slide_1 window
Again, there are lots of options here. Note that we're adding a
height: and width: of 512x128. This is the on-screen pixel size of
the DMD as it will be drawn in the window. In this case we chose an even
multiple of the source display for the DMD (which is 128x32), meaning
that each pixel of the original DMD will be rendered on screen as 4
pixels by 4 pixels. This is big enough to get the circular "dot look"
filter to look good, and being an even multiple means that we won't
have any weird moire patterns.
For the on screen DMD, we are able to select the pixel color, because
this is how the DMD will be drawn on the computer screen, and MPF has no
idea what color the actual DMD is. So you can pick any color you want
here. We chose ff5500 which is a classic DMD orange color.
There are other options listed in the dmd effect documentation to control settings like how big the circles are versus the space in between them, the ability to not have the "dot" filter, and the ability to set the "glow" radius of each dot, color tint, limiting the color palette, etc.
Note that in this case, we did not have to add the source_display:
option because we have a display called "dmd" which will automatically
be used as the source for the color DMD widget.
Next, we also added two more widgets to this slide---a text widget with the title of the machine, and a gray rectangle that's slightly larger than the DMD to give it a nice border.
#! displays:
#!   window:
#!     width: 600
#!     height: 200
#!   dmd:
#!     width: 128
#!     height: 32
#!     default: true
slides:
  window_slide_1:
    - type: display
      effects:
        - type: dmd
          dot_color: ff5500
      width: 512
      height: 128
    - type: text
      text: MISSION PINBALL FRAMEWORK
      anchor_y: top
      y: top-3
      font_size: 30
    - type: rectangle
      width: 514
      height: 130
#! slide_player:
#!   show_slide_event:
#!     window_slide_1:
#!       target: window
##! test
#! post show_slide_event
#! advance_time_and_run .1
#! assert_slide_on_top window_slide_1 window
5. Configure the slide to show when MPF starts
Now we have a nice slide with the virtual DMD on it, but if you run MPF, you still won't see it because we didn't tell MPF to show that slide in the window. So that's what we're doing here:
#! displays:
#!   window:
#!     width: 600
#!     height: 200
#!   dmd:
#!     width: 128
#!     height: 32
#!     default: true
#! slides:
#!   window_slide_1:
#!     - type: display
#!       effects:
#!         - type: dmd
#!           dot_color: ff5500
#!       width: 512
#!       height: 128
#!     - type: text
#!       text: MISSION PINBALL FRAMEWORK
#!       anchor_y: top
#!       y: top-3
#!       font_size: 30
#!     - type: rectangle
#!       width: 514
#!       height: 130
slide_player:
  init_done:
    window_slide_1:
      target: window
##! test
#! advance_time_and_run .1
#! assert_slide_on_top window_slide_1 window
If you don't have a slide_player: entry in your machine-wide config, go ahead and add it now. Then create an entry for the init_done event. This is the event that the media controller posts when it's ready to be used, so it's a good event for our use case.
Then under that event, create an entry to show the slide you just
created in the previous step. Notice that we also have to add the
target: window entry to tell the slide player that we want this slide
to show on the "window" target. We need to do this because the default
display (from Step 2) is the DMD, so if we don't specify a target, this
slide will show on the default, which would be the DMD, instead of being
shown on the window. (In this case, we would show a slide on the DMD
which contains a DMD widget whose source is the DMD, and we'd probably
open up some kind of wormhole and destroy the universe. So don't do
that.)
And this point, you're all set! Of course there's no content on the DMD yet because we haven't set up any slide_player entries to add content to it, but that's something you can do by following the tutorial or looking at the guides for the slides and widgets here.
6. What if you don't want the on-screen window?
There might be some scenarios where you just want the physical DMD with no on-screen DMD. (For example, maybe you're using a low-power single board computer and you don't have enough horsepower to run a graphical environment.)
This is fine. To do it, just remove the window-related components from the config.
In this case, you wouldn't need the default: true entry for the dmd
in the displays: section because you only have one display, so it will
automatically be the default.
7. Configure the physical DMD
At this point you have two displays configured, and you have default content showing up in both of them. The final step is to add the configuration for your physical DMD so that MPF can talk to your hardware.
The exact steps to do that vary depending on which DMD hardware platform you've chosen, so click on the one you have from the list below and follow the final instructions there to get everything set up.
Something missing or wrong? You can fix it!
This website is edited by people like you! Is something wrong or missing? Is something out of date, or can you explain it better?
Please help us! You can fix it yourself and be an official "open source" contributor!
It's easy! See our Beginner's guide to editing the docs.
Page navigation via the keyboard: < >
You can navigate this site via the keyboard. There are two modes:
General navigation, when search is not focused:
- F , S , / : open search dialog
- P , , : go to previous page
- N , . : go to next page
While using the search function:
- Down , Up : select next / previous result
- Esc , Tab : close search
- Enter : go to highlighted page in the results