How to configure a modern trough with mechanical switches
Related Config File Sections:
This guide will show you how to configure MPF to use a modern-style trough which uses mechanical leaf switches. If you have a modern trough that uses opto boards, use this guide instead.
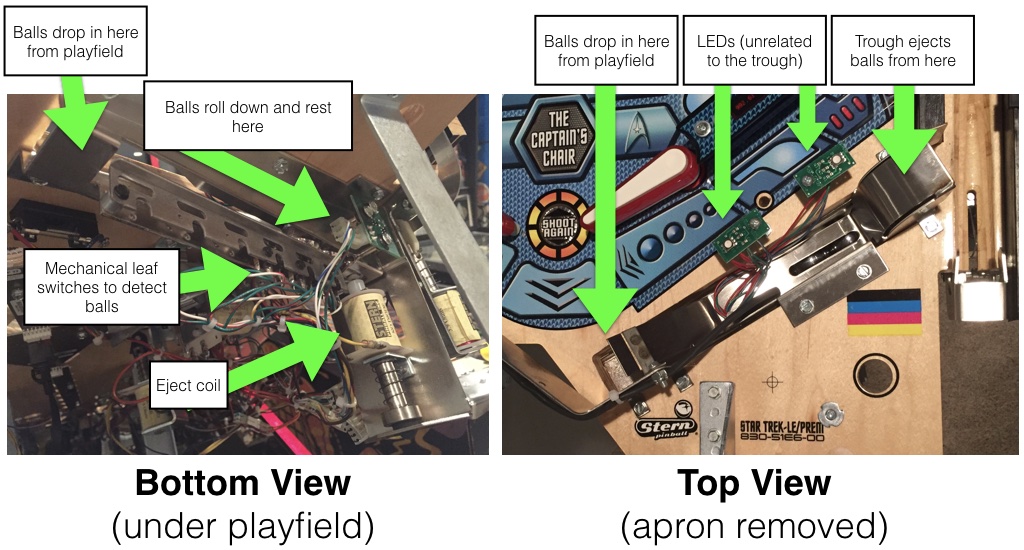
Here's an example from a Stern Star Trek Premium machine:
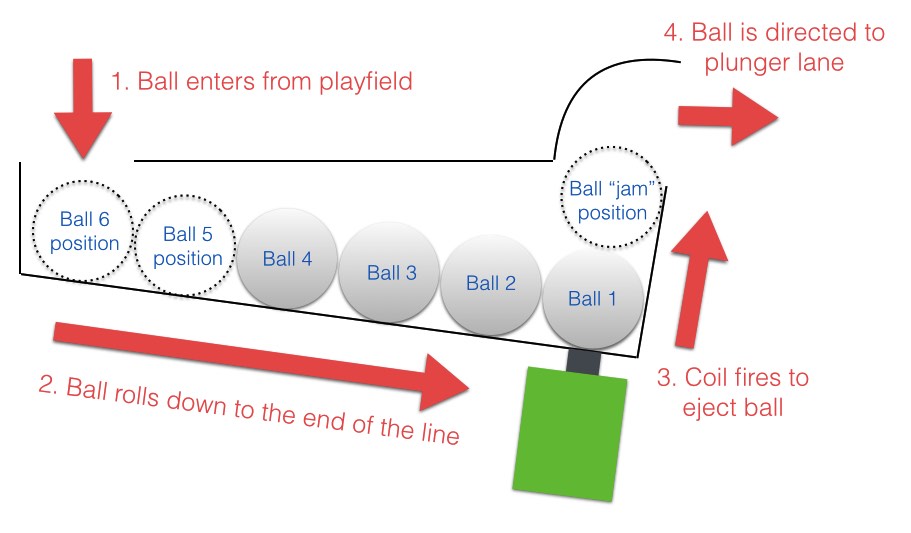
The following diagram shows how the ball flow and eject coil work in a modern trough. (This is a side view)
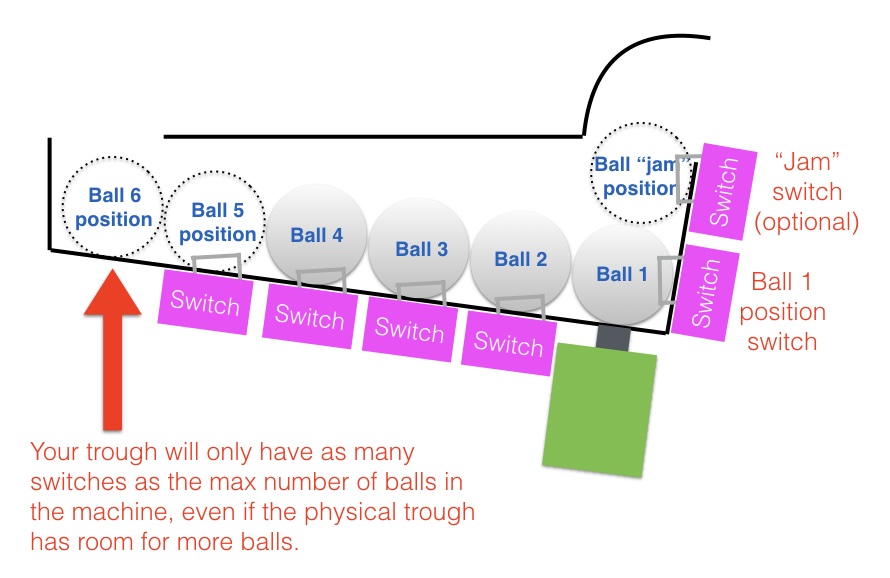
And this diagram shows how the switches are typically arranged in a modern trough with mechanical switches:
Note
Not all modern troughs have the "jam" switch, and depending on how many balls were designed to go in your machine, it's possible that not all the ball switches are populated. (Though you can add more to increase the number of balls in your machine!)
1. Add your trough switches
The first step is to add your trough's switches to the switches:
section of your config file. Create an entry in your switches: section
for each switch in your trough, like this: (This example has six
switches plus the jam switch. Yours may have more or less.)
switches:
  s_trough1:
    number: 2
  s_trough2:
    number: 3
  s_trough3:
    number: 4
  s_trough4:
    number: 5
  s_trough5:
    number: 6
  s_trough6:
    number: 7
  s_trough_jam:
    number: 8
Note that we configured this switches with numbers 02 through 08,
but you should use the actual switch numbers for your control system
that the trough switches are connected to. (See
How to configure "number:" settings for instructions for
each type of control system.)
It makes no difference which switch is which (in terms of whether Switch 1 is on the left side or the right side). Also the actual switch names don't really matter. We use s_trough1 through s_trough6 plus s_trough_jam, though you can call them s_ball_trough_1 or trough_ball_1 or s_mr_potatohead.
Note
The "jam" switch position is the switch which detects if a ball is sitting on top of the lowest ball. Not all troughs have this, so if yours doesn't, that's fine---just don't enter it. (If you have it though you definitely want to use it because it makes MPF smarter about how it handles balls that get stacked.)
2. Add your trough eject coil
Next, create an entry in your coils: section for your trough's eject
coil. Again, the name doesn't matter. We'll call this c_trough_eject
and enter it like this:
coils:
  c_trough_eject:
    number: 4
    default_pulse_ms: 20
Again, the number: entries in your config will vary depending on your
actual hardware, and again, you can pick whatever name you want for your
coil.
You'll also note that we went ahead and entered a default_pulse_ms:
value of 20 which will override the default pulse time of 10ms. It's
hard to say at this point what value you'll actually need. You can
always adjust this at any time. You can play with the exact values in a
bit once we finish getting everything set up.
3. Add your "trough" ball device
In MPF, the trough is a
ball device,
so you'll add a configuration for it to the ball_devices: section of
your machine config. (If you don't have that section add it now.)
Then in your ball_devices: section, create an entry called
bd_trough:, like this:
#! switches:
#!   s_trough1:
#!     number: 2
#!   s_trough2:
#!     number: 3
#!   s_trough3:
#!     number: 4
#!   s_trough4:
#!     number: 5
#!   s_trough5:
#!     number: 6
#!   s_trough6:
#!     number: 7
#!   s_trough_jam:
#!     number: 8
#!   s_plunger:
#!     number: 10
#! coils:
#!   c_trough_eject:
#!     number: 4
#!     default_pulse_ms: 20
ball_devices:
  bd_trough:
#!     ball_switches: s_trough1, s_trough2, s_trough3, s_trough4, s_trough5, s_trough6, s_trough_jam
#!     eject_coil: c_trough_eject
#!     tags: trough, home, drain
#!     jam_switch: s_trough_jam
#!     eject_coil_jam_pulse: 15ms
#!     eject_targets: bd_plunger
#!     eject_timeouts: 3s
#!     # bd_plunger is a placeholder just so the trough's eject_targets are valid
#!   bd_plunger:
#!     ball_switches: s_plunger
#!     mechanical_eject: true
#!     eject_timeouts: 5s
#! playfields:
#!   playfield:
#!     default_source_device: bd_plunger
#!     tags: default
#! virtual_platform_start_active_switches: s_trough1, s_trough2, s_trough3, s_trough4, s_trough5, s_trough6
This means that you're creating a ball device called bd_trough. We
use the preface bd_ to indicate that this is a ball device which
makes it easier when we're referencing them later. Then under your
bd_trough: entry, start entering the configuration settings for your
trough ball device:
3a. Add your trough switches to your trough ball device
Indented under bd_trough:, create an entry called ball_switches: and
then add a comma-separated list of all the switches in your trough, like
this:
#! switches:
#!   s_trough1:
#!     number: 2
#!   s_trough2:
#!     number: 3
#!   s_trough3:
#!     number: 4
#!   s_trough4:
#!     number: 5
#!   s_trough5:
#!     number: 6
#!   s_trough6:
#!     number: 7
#!   s_trough_jam:
#!     number: 8
#!   s_plunger:
#!     number: 10
#! coils:
#!   c_trough_eject:
#!     number: 4
#!     default_pulse_ms: 20
ball_devices:
  bd_trough:
    ball_switches: s_trough1, s_trough2, s_trough3, s_trough4, s_trough5, s_trough6, s_trough_jam
#!     eject_coil: c_trough_eject
#!     tags: trough, home, drain
#!     jam_switch: s_trough_jam
#!     eject_coil_jam_pulse: 15ms
#!     eject_targets: bd_plunger
#!     eject_timeouts: 3s
#!     # bd_plunger is a placeholder just so the trough's eject_targets are valid
#!   bd_plunger:
#!     ball_switches: s_plunger
#!     mechanical_eject: true
#!     eject_timeouts: 5s
#! playfields:
#!   playfield:
#!     default_source_device: bd_plunger
#!     tags: default
#! virtual_platform_start_active_switches: s_trough1, s_trough2, s_trough3, s_trough4, s_trough5, s_trough6
So this is eight spaces, followed by the word "ball_switches", then a colon, then a space, then the name of your first switch, comma, then your second switch, comma, etc...
Again these switches can be in any order. The key is that you're entering one switch for each position that's used to detect whether a ball is in the trough at that position.
If you have the switch in the jam position, enter it in this list too, since a ball sitting on top of another one still "counts" as a ball in the trough.
The number of switches you enter here will tell MPF how many balls your trough can hold. When MPF wants to know how many balls are in the trough, it will check all these switches to see which ones are active, and the total number active represents how many balls it's holding at that moment.
3b. Add your eject coil to your trough ball device
Next create a setting called eject_coil: which will be the name of the
coil that MPF should fire when it wants to eject a ball from the trough.
This should be the name of the coil you added in Step 2,
c_trough_eject in our case:
#! switches:
#!   s_trough1:
#!     number: 2
#!   s_trough2:
#!     number: 3
#!   s_trough3:
#!     number: 4
#!   s_trough4:
#!     number: 5
#!   s_trough5:
#!     number: 6
#!   s_trough6:
#!     number: 7
#!   s_trough_jam:
#!     number: 8
#!   s_plunger:
#!     number: 10
#! coils:
#!   c_trough_eject:
#!     number: 4
#!     default_pulse_ms: 20
ball_devices:
  bd_trough:
    ball_switches: s_trough1, s_trough2, s_trough3, s_trough4, s_trough5, s_trough6, s_trough_jam
    eject_coil: c_trough_eject
#!     tags: trough, home, drain
#!     jam_switch: s_trough_jam
#!     eject_coil_jam_pulse: 15ms
#!     eject_targets: bd_plunger
#!     eject_timeouts: 3s
#!     # bd_plunger is a placeholder just so the trough's eject_targets are valid
#!   bd_plunger:
#!     ball_switches: s_plunger
#!     mechanical_eject: true
#!     eject_timeouts: 5s
#! playfields:
#!   playfield:
#!     default_source_device: bd_plunger
#!     tags: default
#! virtual_platform_start_active_switches: s_trough1, s_trough2, s_trough3, s_trough4, s_trough5, s_trough6
Note that MPF will simply pulse the eject coil at its default pulse time when it wants to eject a ball from the trough.
3c. Add some tags to tell MPF about this device
The final configuration setting you need to enter for your trough is a list of tags which tell MPF certain things about this device.
Tags are just a comma-separated list of words you add to the tags:
setting for a device. Ball devices can use some special tag names that
tell MPF how it should use it.
First, add a tag called trough which tells MPF that a ball device
wants to hold as many balls as it can. This probably doesn't make sense
right now, which is fine, but without this tag then MPF won't know what
to do with all the balls that are sitting in the trough waiting to be
launched. This tag tells MPF that it's fine for this device to hold
lots of balls.
Next, add a tag called home which tells MPF that any balls in this
device are considered to be in their "home" positions. When MPF first
starts up, and after a game ends, it will automatically eject any balls
from any devices that are not tagged with "home." When a player tries
to start a game, MPF will also make sure all the balls in the machine
are contained in devices tagged with "home."
Finally, you need to add a tag called drain which is used to tell MPF
that a ball entering this device means that a live ball has drained from
the playfield. At this point you might be wondering why you have to
enter all three of these tags. Why can't the simple trough tag be
enough to tell MPF that a ball entering it should trigger a drain and
that balls are home? This is due to the flexibility of MPF and the
nearly unlimited variations of pinball machine hardware in the world.
Some machines have multiple troughs. Some machines have drain devices
which aren't troughs. Some machines consider balls outside the trough
to be home. So even though these all might seem similar, just know that
for now you have to add trough, home, and drain tags to your
trough. You can specify the tags in any order, and your tags: entry
should look something like this:
#! switches:
#!   s_trough1:
#!     number: 2
#!   s_trough2:
#!     number: 3
#!   s_trough3:
#!     number: 4
#!   s_trough4:
#!     number: 5
#!   s_trough5:
#!     number: 6
#!   s_trough6:
#!     number: 7
#!   s_trough_jam:
#!     number: 8
#!   s_plunger:
#!     number: 10
#! coils:
#!   c_trough_eject:
#!     number: 4
#!     default_pulse_ms: 20
ball_devices:
  bd_trough:
    ball_switches: s_trough1, s_trough2, s_trough3, s_trough4, s_trough5, s_trough6, s_trough_jam
    eject_coil: c_trough_eject
    tags: trough, home, drain
#!     jam_switch: s_trough_jam
#!     eject_coil_jam_pulse: 15ms
#!     eject_targets: bd_plunger
#!     eject_timeouts: 3s
#!     # bd_plunger is a placeholder just so the trough's eject_targets are valid
#!   bd_plunger:
#!     ball_switches: s_plunger
#!     mechanical_eject: true
#!     eject_timeouts: 5s
#! playfields:
#!   playfield:
#!     default_source_device: bd_plunger
#!     tags: default
#! virtual_platform_start_active_switches: s_trough1, s_trough2, s_trough3, s_trough4, s_trough5, s_trough6
3d. Add & configure your jam switch
If you have a jam switch, add a setting called jam_switch: and add it
there, like this:
#! switches:
#!   s_trough1:
#!     number: 2
#!   s_trough2:
#!     number: 3
#!   s_trough3:
#!     number: 4
#!   s_trough4:
#!     number: 5
#!   s_trough5:
#!     number: 6
#!   s_trough6:
#!     number: 7
#!   s_trough_jam:
#!     number: 8
#!   s_plunger:
#!     number: 10
#! coils:
#!   c_trough_eject:
#!     number: 4
#!     default_pulse_ms: 20
ball_devices:
  bd_trough:
    ball_switches: s_trough1, s_trough2, s_trough3, s_trough4, s_trough5, s_trough6, s_trough_jam
    eject_coil: c_trough_eject
    tags: trough, home, drain
    jam_switch: s_trough_jam
#!     eject_coil_jam_pulse: 15ms
#!     eject_targets: bd_plunger
#!     eject_timeouts: 3s
#!     # bd_plunger is a placeholder just so the trough's eject_targets are valid
#!   bd_plunger:
#!     ball_switches: s_plunger
#!     mechanical_eject: true
#!     eject_timeouts: 5s
#! playfields:
#!   playfield:
#!     default_source_device: bd_plunger
#!     tags: default
#! virtual_platform_start_active_switches: s_trough1, s_trough2, s_trough3, s_trough4, s_trough5, s_trough6
You can also configure an eject pulse time (in ms) that will be used when the trough wants to eject a ball but the jam switch is active. You'll have to play with your actual trough to see what this time should be. In most cases it's actually less time than the regular eject pulse time, because in most cases, the regular pulse time will kick out two balls (the jammed ball and the one below it).
So for our example, we'll set the jam pulse time to 15ms.
#! switches:
#!   s_trough1:
#!     number: 2
#!   s_trough2:
#!     number: 3
#!   s_trough3:
#!     number: 4
#!   s_trough4:
#!     number: 5
#!   s_trough5:
#!     number: 6
#!   s_trough6:
#!     number: 7
#!   s_trough_jam:
#!     number: 8
#!   s_plunger:
#!     number: 10
#! coils:
#!   c_trough_eject:
#!     number: 4
#!     default_pulse_ms: 20
ball_devices:
  bd_trough:
    ball_switches: s_trough1, s_trough2, s_trough3, s_trough4, s_trough5, s_trough6, s_trough_jam
    eject_coil: c_trough_eject
    tags: trough, home, drain
    jam_switch: s_trough_jam
    eject_coil_jam_pulse: 15ms
#!     eject_targets: bd_plunger
#!     eject_timeouts: 3s
#!     # bd_plunger is a placeholder just so the trough's eject_targets are valid
#!   bd_plunger:
#!     ball_switches: s_plunger
#!     mechanical_eject: true
#!     eject_timeouts: 5s
#! playfields:
#!   playfield:
#!     default_source_device: bd_plunger
#!     tags: default
#! virtual_platform_start_active_switches: s_trough1, s_trough2, s_trough3, s_trough4, s_trough5, s_trough6
(Note that this setting is a time string, so you can include the "ms" in the setting value.)
4. Configure your virtual hardware to start with balls in the trough
While we're talking about the trough, it's probably a good idea to
configure MPF so that when you start it in virtual mode (with no
physical hardware) that it starts with the trough full of balls. To do
this, add a new section to your config file called
virtual_platform_start_active_switches:. (Sorry this entry name is
hilariously long.) As its name implies,
virtual_platform_start_active_switches: lets you list the names of
switches that you want to start in the "active" state when you're
running MPF with the virtual platform interfaces.
The reason these only work with the virtual platforms is because if you're running MPF while connected to a physical pinball machine, it doesn't really make sense to tell MPF which switches are active since MPF can read the actual switches from the physical machine. So you can add this section to your config file, but MPF only reads this section when you're running with one of the virtual hardware interfaces. To use it, simply add the section along with a list of the switches you want to start active. For example:
#! switches:
#!   s_trough1:
#!     number: 2
#!   s_trough2:
#!     number: 3
#!   s_trough3:
#!     number: 4
#!   s_trough4:
#!     number: 5
#!   s_trough5:
#!     number: 6
#!   s_trough6:
#!     number: 7
#!   s_trough_jam:
#!     number: 8
virtual_platform_start_active_switches:
  - s_trough1
  - s_trough2
  - s_trough3
  - s_trough4
  - s_trough5
  - s_trough6
5. Add your plunger lane
Remember that ball devices in MPF know what their "target" devices are, meaning that they understand the chain of devices the ball path takes. (For example, the trough ejects to the plunger lane which ejects to the playfield which drains to the trough...)
So in order to completely configure your trough, you need to tell it the name of thes devices that it ejects to. For the purposes of this How To guide, we'll just create a placeholder plunger lane called bd_plunger, though you should see the Plungers & Ball Launch Devices documentation for full details since there are lots of different types of plungers.
You add an eject target via the eject_targets: section, like this:
#! switches:
#!   s_trough1:
#!     number: 2
#!   s_trough2:
#!     number: 3
#!   s_trough3:
#!     number: 4
#!   s_trough4:
#!     number: 5
#!   s_trough5:
#!     number: 6
#!   s_trough6:
#!     number: 7
#!   s_trough_jam:
#!     number: 8
#!   s_plunger:
#!     number: 10
#! coils:
#!   c_trough_eject:
#!     number: 4
#!     default_pulse_ms: 20
ball_devices:
  bd_trough:
    ball_switches: s_trough1, s_trough2, s_trough3, s_trough4, s_trough5, s_trough6, s_trough_jam
    eject_coil: c_trough_eject
    tags: trough, home, drain
    jam_switch: s_trough_jam
    eject_coil_jam_pulse: 15ms
    eject_targets: bd_plunger
#!     eject_timeouts: 3s
  bd_plunger:
    ball_switches: s_plunger
    mechanical_eject: true
#!     eject_timeouts: 5s
#! playfields:
#!   playfield:
#!     default_source_device: bd_plunger
#!     tags: default
#! virtual_platform_start_active_switches: s_trough1, s_trough2, s_trough3, s_trough4, s_trough5, s_trough6
Of course you should enter the name of your actual plunger lane / ball launcher device.
Note that the eject_targets: entry is "targets" (plural), but in
this case we're only adding a single target. That's fine and how you
would configure a trough since it only ejects to one place (the plunger
lane). Some devices eject to pathways with diverters which can direct
the ball to multiple different places, so that's the scenario where
you'd enter more than one target. But for the trough, it's just the
one.
6. Configure eject timeouts
Your trough will try to eject as fast as possible (i.e. during a
multiball) but it has to wait that ball cannot return and stack up. By
default MPF will wait 10s after a ball to make sure that it settled in
the shooter lane or returned (in the latter case the trough will retry
the eject). For the trough this works fine if the ball actually settles
in the shooter lane but sometimes a player might as well launch the ball
without hitting the plunger switch. For that reason it is important to
set eject_timeouts to your shooter lane and your trough. You should
measure how long the maximum time is until a ball cannot possibly return
to your trough and plunger (with some safty margin). Usually this is
about 2s - 4s for a trough and 3s - 5s for a plunger.
#! switches:
#!   s_trough1:
#!     number: 2
#!   s_trough2:
#!     number: 3
#!   s_trough3:
#!     number: 4
#!   s_trough4:
#!     number: 5
#!   s_trough5:
#!     number: 6
#!   s_trough6:
#!     number: 7
#!   s_trough_jam:
#!     number: 8
#!   s_plunger:
#!     number: 10
#! coils:
#!   c_trough_eject:
#!     number: 4
#!     default_pulse_ms: 20
ball_devices:
  bd_trough:
    ball_switches: s_trough1, s_trough2, s_trough3, s_trough4, s_trough5, s_trough6, s_trough_jam
    eject_coil: c_trough_eject
    tags: trough, home, drain
    jam_switch: s_trough_jam
    eject_coil_jam_pulse: 15ms
    eject_targets: bd_plunger
    eject_timeouts: 3s
  bd_plunger:
    ball_switches: s_plunger
    mechanical_eject: true
    eject_timeouts: 5s
#! playfields:
#!   playfield:
#!     default_source_device: bd_plunger
#!     tags: default
#! virtual_platform_start_active_switches: s_trough1, s_trough2, s_trough3, s_trough4, s_trough5, s_trough6
Here's the complete config
switches:
  s_trough1:
    number: 2
  s_trough2:
    number: 3
  s_trough3:
    number: 4
  s_trough4:
    number: 5
  s_trough5:
    number: 6
  s_trough6:
    number: 7
  s_trough_jam:
    number: 8
  s_plunger:
    number: 10
coils:
  c_trough_eject:
    number: 4
    default_pulse_ms: 20
ball_devices:
  bd_trough:
    ball_switches: s_trough1, s_trough2, s_trough3, s_trough4, s_trough5, s_trough6, s_trough_jam
    eject_coil: c_trough_eject
    tags: trough, home, drain
    jam_switch: s_trough_jam
    eject_coil_jam_pulse: 15ms
    eject_targets: bd_plunger
    eject_timeouts: 3s
  bd_plunger:
    ball_switches: s_plunger
    mechanical_eject: true
    eject_timeouts: 5s
playfields:
  playfield:
    default_source_device: bd_plunger
    tags: default
virtual_platform_start_active_switches: s_trough1, s_trough2, s_trough3, s_trough4, s_trough5, s_trough6
What if it doesn't work?
Have a look at our troubleshooting guide for ball_devices.
Something missing or wrong? You can fix it!
This website is edited by people like you! Is something wrong or missing? Is something out of date, or can you explain it better?
Please help us! You can fix it yourself and be an official "open source" contributor!
It's easy! See our Beginner's guide to editing the docs.
Page navigation via the keyboard: < >
You can navigate this site via the keyboard. There are two modes:
General navigation, when search is not focused:
- F , S , / : open search dialog
- P , , : go to previous page
- N , . : go to next page
While using the search function:
- Down , Up : select next / previous result
- Esc , Tab : close search
- Enter : go to highlighted page in the results