How to configure switches (P3-ROC)
Related Config File Sections:
To configure switches on a P3-ROC, you can follow the guides and instructions in the drivers docs.
However there are a few things to know about using switches with a P3-ROC.
number:
Unlike the P-ROC, the P3-ROC does not have switch inputs on the P3-ROC itself. Instead, you add SW-16 boards which each have 16 direct switch inputs. (e.g. there is no switch matrix.) You can connect up to 16 SW-16s to support as many as 256 switches.
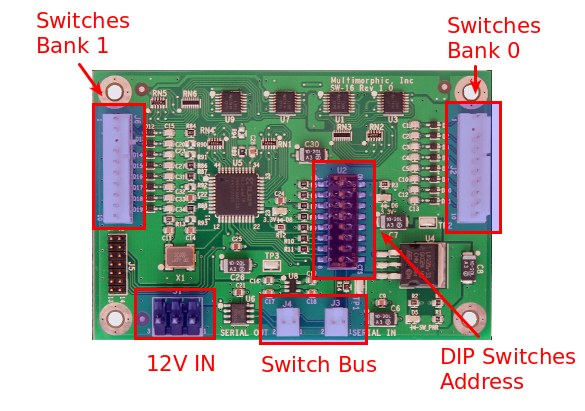
Each SW-16 has a unique board number which is set using DIP switches
(find that out now). On each board there are two banks (A and B) of 8
switches. Then each switch has an input number (0 to 7).
To configure the number: of a switch connected to an SW-16 board and a
P3-ROC, you have two options:
Board Bank Switch Syntax
The first (and easier) option is to enter the number as a combination of
the SW-16 board address (0-15, as configured by the DIP switches),
then the bank number (Bank A is 0, Bank B is 1), then the switch
input number (0-7).
For example:
switches:
  my_switch:
    number: A0-B0-0    # SW-16 board at address 0, Bank A, Switch 0
  my_other_switch:
    number: A2-B1-5    # SW-16 board at address 2, Bank B, Switch 5
Direct Numbering
You can also use the internal number. As mentioned in the SW-16 manual you can calculate those using:
Bank A switch: P3-ROC switch # = SW-16 address * 16 + Bank A switch input
Bank B switch: P3-ROC switch # = SW-16 address * 16 + 8 + Bank B switch input
However, we recommend the above syntax because it will perform this calcuation for you.
For example:
switches:
  my_switch:
    number: 0     # SW-16 board at address 0, Bank A, Switch 0
  my_other_switch:
    number: 45    # SW-16 board at address 2, Bank B, Switch 5
Connecting Switches
Switches are connected between the input pin and ground. On SW-16 revision 1 those are pins 1, 3-9 for switch 0 to 7 on bank A (J2) and 1, 2, 4-9 for switch 0 to 7 on bank B (J6). Ground is on 10 for both banks. On SW-16 revision 2 those are pins 2 to 9 for switch 0 to 7 and 10 for ground on headers J2 (Bank A) and J6 (Bank B). Revision two has an additional low current 12V output on pin 1.
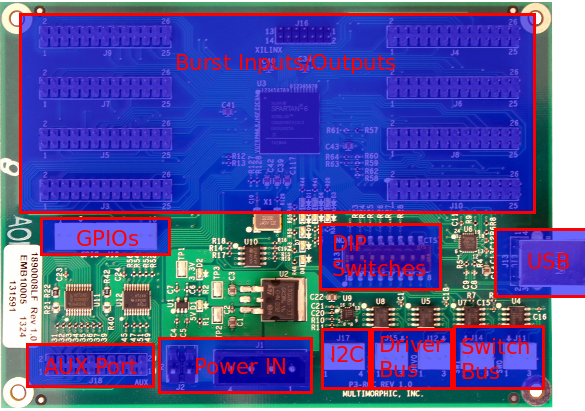
Burst Switch Inputs
Burst switch inputs (J3 to J10) on the P3-Roc can be used in two ways in MPF.
- Burst Optos - As burst switch inputs in combination with a burst switcher driver can drive long-beam optos. This is how they were originally intended.
- Local Inputs - Alternatively you can use them as direct local inputs (and the burst drivers as outputs; see How to configure coils/drivers/magnets (P-ROC/P3-ROC) section for details).
Burst Switches as Burst Optos
You can configure burst optos using the following syntax:
switches:
  burst_opto_1_20:
    number: burst-1-20     # burst input with switch 1 and driver 20
  burst_opto_2_20:
    number: burst-2-20     # burst input with switch 2 and driver 20
  burst_opto_10_5:
    number: burst-10-5     # burst input with switch 10 and driver 5
Make sure to disable DIP switches 1 and 2 on the P3-Roc. You can configure up to five switches per driver.
Note
There is currently no reliable way to read the initial state of burst optos. MPF will assume that all burst IRs are open on start-up. This might cause if you use it to track balls in a ball lock which might contain balls from a previous game. This limitation will probably go away in future firmware update of the P3-Roc.
Burst Opto PCBs
Burst optos are unlike normal optos and you cannot use normal optos. Instead, they use 40kHz infrared transmitters and receivers. Multimorphic sells them as single transmitter/receiver (part number: PCBA-0011-0002) and as bank of 8 (part number: PCBA-0003-0003).
Burst Switches as Local Inputs
If you want to use burst switches as local inputs set DIP switch 2 to
on on the P3-Roc. You can use those 64 inputs as direct inputs:
switches:
  local_switch0:
    number: direct-0       # local input 0
  local_switch20:
    number: direct-20      # local input 20
Make sure to assign IDs >= 4 to all SW-16 boards if you set DIP 2. Local switches behave just like any other switch on the P3-Roc. Hardware rules, debouncing etc. will behave exactly the same way.
Note
You need at least Firmware version 2.6 to use burst switches as local inputs on the P3-Roc.
Warning
There is no electronic protection on the P3-Roc for burst switches (neither as local inputs nor as burst optos). Do not use them without additional protection. Any voltage above 3.3V or below 0V will irreversibly damage the P3-Roc. Make sure you know what you are doing before turning this on. We advise to use SW-16 for normal playfield/mech inputs and only use local inputs with additional circuits (not directly). If you plan to use burst optos have a look at the PCBs offered from Multimorphic for that purpose.
Debounce options
The P-ROC has the ability to configure debounce settings for switches. A non-debounced switch which report its state change immediately, while a debounced switch will report its state change after it's been in the new state for two consecutive reads.
By default, MPF will enable debouncing in both directions (open and
close) for all switches. However you can override this on a per-switch
basis with a switch's debounce: setting.
Valid options are normal, quick, and auto.
To disable debouncing for a switch, add debounce: quick to the switch
config, like this:
switches:
  my_switch:
    number: A0-B0-0
    debounce: quick
To force debouncing to always be used (which is also the default on the P-ROC, so not really needed), configure it like this:
switches:
  my_switch:
    number: A0-B0-0
    debounce: normal
What if it did not work?
Have a look at our troubleshooting guide for the P/P3-Roc.
Something missing or wrong? You can fix it!
This website is edited by people like you! Is something wrong or missing? Is something out of date, or can you explain it better?
Please help us! You can fix it yourself and be an official "open source" contributor!
It's easy! See our Beginner's guide to editing the docs.
Page navigation via the keyboard: < >
You can navigate this site via the keyboard. There are two modes:
General navigation, when search is not focused:
- F , S , / : open search dialog
- P , , : go to previous page
- N , . : go to next page
While using the search function:
- Down , Up : select next / previous result
- Esc , Tab : close search
- Enter : go to highlighted page in the results