MPF Showcreator
MPF supports playing light shows out of files in your config folder. Those are human readable and can be created by hand. But isn't that a bit cumbersome for larger shows? Especially, if you want to swipe over all (or most) of your LEDs this might take days. Luckily, there are two tools for that.
A) MPF Showcreator based on playfield layout
The light show generator for MPF loads your LED positions from the MPF Monitor config and lets you create show for transitions.
Video about showcreator:
Shows in MPF are written in YAML and can be used universally to control all kinds of things (such as lights, coils, slides, widgets, sounds and more). Basically, shows are a list of actions combined with a duration after which the next element in the list is played. Here is an example of a light show with three lights which sequentially turn blue over one second:
##! show: my_show
#show_version=5
- duration: .25
  lights:
    l_arrow_1: off
    l_arrow_2: off
    l_arrow_3: off
- duration: .25
  lights:
    l_arrow_1: blue
    l_arrow_2: off
    l_arrow_3: off
- duration: .25
  lights:
    l_arrow_1: blue
    l_arrow_2: blue
    l_arrow_3: off
- duration: .25
  lights:
    l_arrow_1: blue
    l_arrow_2: blue
    l_arrow_3: blue
In this simple example it totally makes sense to create the show by hand. You could also throw in tokens for the lights and reuse the show all over the machine for different light triples.
However, imagine you want to swipe over all lights in your machine. That would be a lot of text and also hard to get right manually. Luckily, Mark, the maker of the Nightmare before Christmas custom pinball machine, created this awesome MPF Lightshow generator.
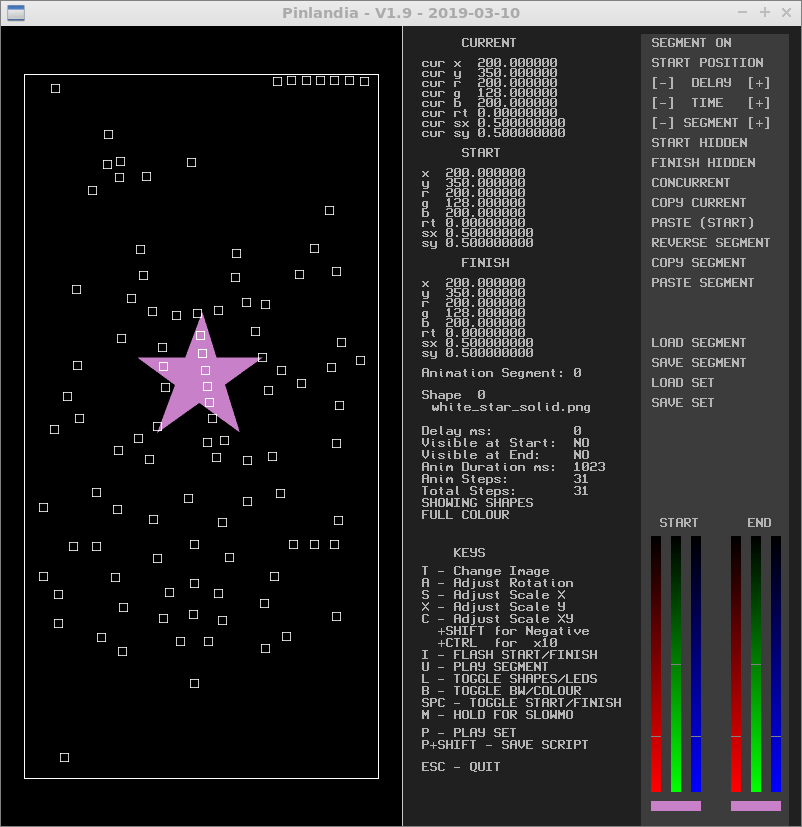
The tool allows you to set a shape (i.e. a star in the example), choose a start and an end position and color. Based on that it will create a light show for you which contains one section per step (at a defined frame rate). Neat right? You might ask: How does it know where my lights are located on the playfield?
Luckily, you probably already have them set if you used the
MPF Monitor. It
allows you to use drag and drop to position all your switches and lights
on a playfield image. Those positions are then saved to the
monitor/monitor.yaml file in your machine folder. All you have to do
is point the light show creator to the monitor/monitor.yaml file on
startup.
You set the start and end positions, rotations, scales and colors of that shape anywhere you want over the playfield.
Here we start with a gradient bar at the top of the playfield in a pink color.
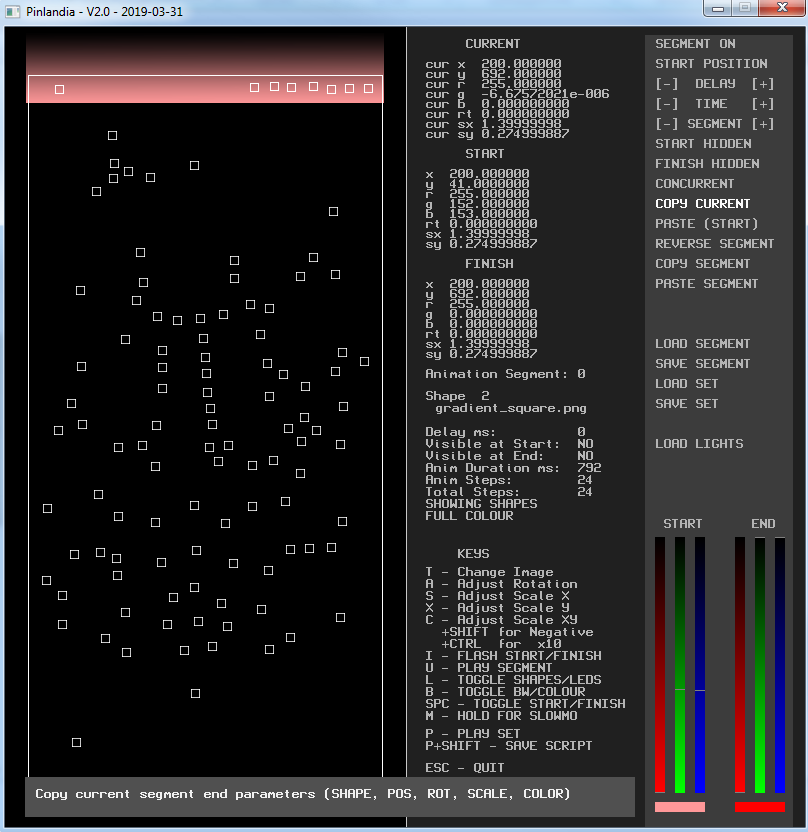
We want the final position to be here at the bottom, in a darker red shade.
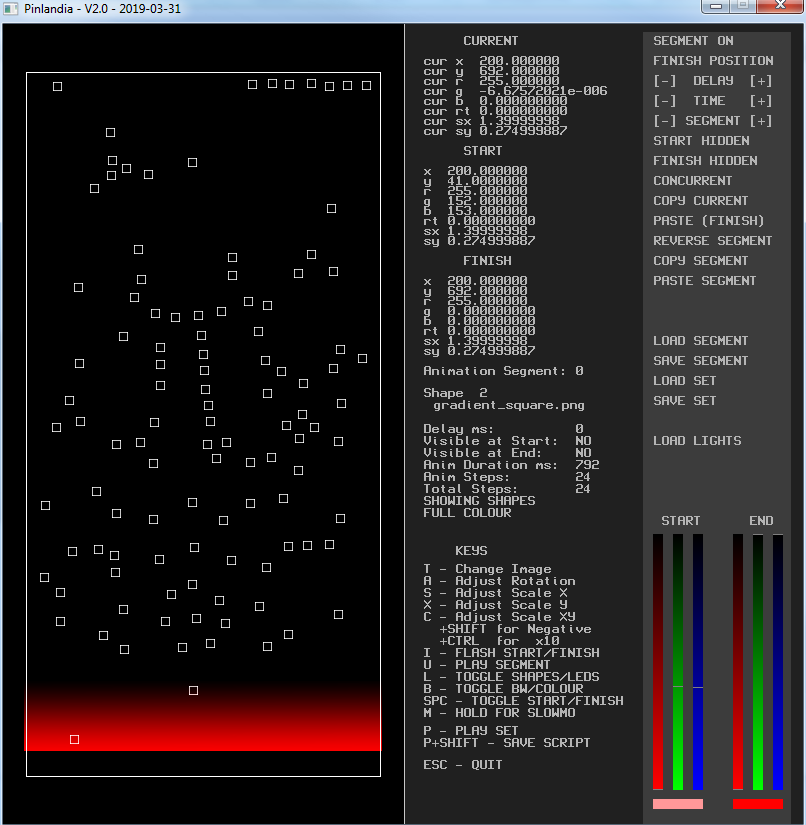
You can then adjust the length of the animation in milliseconds and hence the number of steps in the final show. In this example, the shape will be moved from the start to finish in 24 steps.
Based on these settings, it will create a light show for you which contains all needed commands per step for each of the lights the shape passes over. Lightshow playback speed can be adjusted in MPF.
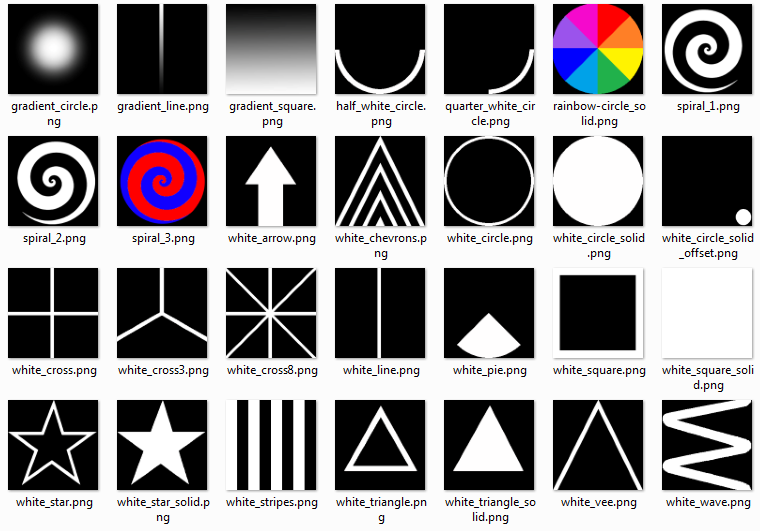
You're not restricted to just the included shapes. You can make your own shapes and drop them in the shapes folder.
Once you get the hang of animating a single shape, you can go further by
adding in more shapes. You can add a total of 256 shapes in animation
segments. Each segment can be set to concurrent (start and end same
time as the previous segment) or follow (start after previous segment)
This allows for more interesting multipart shows. For example you could
have several color swipes coming from different directions one after the
other or effects like multiple spotlights moving across the playfield
like a hollywood premiere.
Running the showcreator on Windows
- Checkout or download the showcreator repository.
- Double click on led.exe
Running the showcreator on Mac x64
- Checkout or download the showcreator repository.
- Double click on: led mac x64.app (you may not see .app in the name)
Running the showcreator on Linux
The showcreator is developed with a development language called Blitzmax, there is no precompiled executable for Linux available, so we need to follow the Blitzmax homepage to set up the development environment to compile an executable.
As a first step some pre-requisites need to be met, follow these guidelines to install the packages needed. On that page you find the instructions for some common Linux distros.
Next you need to download the Blitzmax environment from here, that is just a compressed folder you need to extract to any location on your computer. Inside that folder you should
see an executable called MaxIDE, that is the development IDE you need to start. You could follow this Hello World Guide to verify if the installation
is correct until here, but it is not compulsory to do so.
Now you need the source code from the showcreator project, you need to clone the complete project
git clone https://github.com/missionpinball/showcreator.git
It is not sufficient just to download the led.bmx source file, though the build will succeed, the execution of the showcreator will fail earlier or later due to missing dependencies. Open the led.bmx source file in the MaxIDE. In the MaxIDE in the menu Program --> Build Options --> Debug Build you can switch off
the debug build that is not really needed. Now compile (build) the source code by selection Program --> Build. When building the first time, it might run some time since Blitzmax needs to compile all kind of
dependencies. After the build is done, you find in the same folder where your source file is located an executable called led.
Afterwards you can run the showcreator using (from within your install folder):
./led
Note, that on the console, which might be hidden by the showcreator window, you are being asked for the monitor.yaml file. Enter the file location to load your light data.
Key bindings
- A - adjust rotation
- S - adjust x scale
- X - adjust y scale
- C - adjust both x and y scales
- HOLD SHIFT to reverse above functions
- HOLD CTRL to increase functions by 10X
- I - flash between START and FINISH end points
- L - toggle between viewing SHAPES or affected LEDs
- B - toggle between BW and full colour output
- B+SHIFT - change the B/W Threshold (16-240)/256
- SPC - toggle between START and FINISH end points
- U - play segment
- P - play complete set
- M - HOLD for slow motion during segment/set play
- P+SHIFT - play set and create script file
- ESC - quit - Y/N confirm quit
- Left Mouse Button Down over playfield adjusts position of current end (START or FINISH) +SHIFT adjusts both START AND FINISH positions
Dynamic Shows
The tool is handy to render static shows which will not change during runtime. If you want to render shows dynamically (using your GPU) you can also use your lights as display in MC but that will cost much more resources during runtime than offline generated shows.
B) MPF light and show creator
Another tool exists to create light shows. It is has a bit different approach and is not based on the monitor.yaml file. Take a look at the tool's homepage to see if this approach suites your needs.
Something missing or wrong? You can fix it!
This website is edited by people like you! Is something wrong or missing? Is something out of date, or can you explain it better?
Please help us! You can fix it yourself and be an official "open source" contributor!
It's easy! See our Beginner's guide to editing the docs.
Page navigation via the keyboard: < >
You can navigate this site via the keyboard. There are two modes:
General navigation, when search is not focused:
- F , S , / : open search dialog
- P , , : go to previous page
- N , . : go to next page
While using the search function:
- Down , Up : select next / previous result
- Esc , Tab : close search
- Enter : go to highlighted page in the results