How to configure MPF for Stern SPIKE hardware
Related Config File Sections:
This guide explains how to configure MPF to work with Stern SPIKE pinball machines. It applies to SPIKE and SPIKE 2 systems.
1. Install the drivers for your USB-to-serial adapter
Before you proceed, make sure that you have the drivers properly installed for your USB-to-serial adapter and that when you plug it in, you see the serial port.
2. Configure your hardware platform for SPIKE
To use MPF with a SPIKE hardware, you need to configure your platform as
spike in your machine-wide config file. You'll also need to add a
"spike:" section with some additional settings:
hardware:
  platform: spike
spike:
  port: /dev/ttyUSB0
  baud: 115200
  flow_control: false
  debug: false
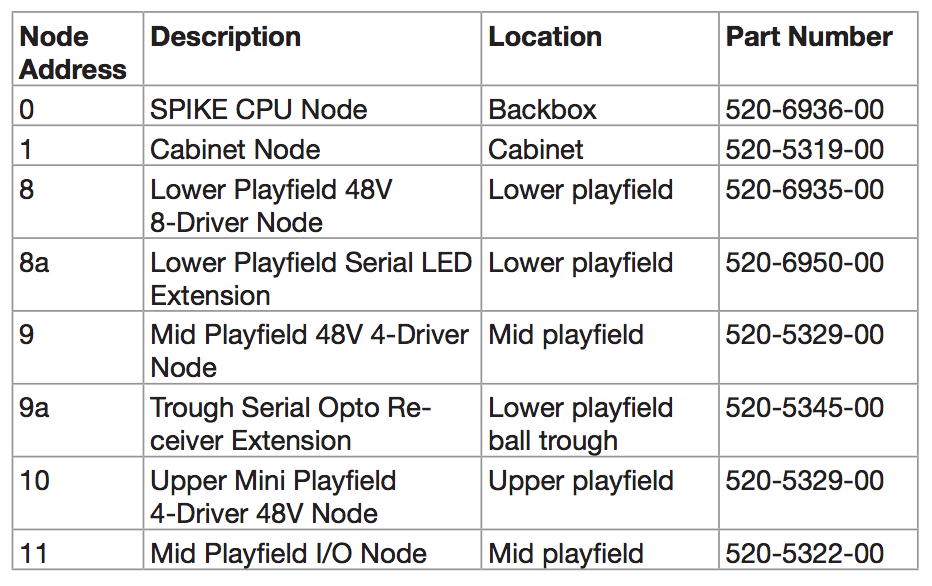
  nodes: 0, 1, 8, 9, 10, 11
  runtime_baud: 115200
Some notes on the settings:
port:
Use the port of your USB-serial adapter or of the internal serial on your computer. On Windows, this will have a name like "COM5".
baud:
This needs to match the value from Step 3 in the
MPF SPIKE bridge instructions. It is used to initialize the connection to SPIKE only.
Afterwards, the bridge will switch to runtime_baud.
flow_control:
If your hardware supports flow control and you connected "RTS" and
"CTS" in the previous steps set this to True. It will make the
connection much more stable at higher speeds. It can be False for
a first test.
runtime_baud:
Note that since only control and switch information is sent across this bus, 115k baud is plenty fast enough if you choose not to use a DMD. However, if you want to use a DMD you need more speed (see below for details).
debug:
Set this to true for print more details in the log.
nodes:
This is a list of the node board addresses that your system has. You can get this from the manual. Here's an example from Wrestlemania Pro:

  Only map the node boards and ignore the extension boards because
those   are transparent to MPF. Just consider 8 and 8a/8b to be the
same node.
Once you got your game running you can increase the speed using
runtime_baud:
hardware:
  platform: spike
spike:
  port: /dev/ttyUSB0
  baud: 115200
  runtime_baud: 2000000
  flow_control: true
  debug: false
  nodes: 0, 1, 8, 9, 10, 11
This will increase the baudrate after the start of the mpf-spike-bridge. You do not have to change anything to use this setting. The following baudrate are supported:
- 230400
- 460800
- 576000
- 1000000
- 1152000
- 2000000
- 2500000
- 3000000
- 3500000
- 4000000
Depending on your hardware setup they might or might not work. Most setups communicate reliably up to something beween 1Mbaud and 2.5Mbaud. To stream full 30fps to your DMD you need about 2Mbaud. You need flow_control at rates higher than about 0.5MBaud.
What if it did not work?
Have a look at our SPIKE troubleshooting guide.
Something missing or wrong? You can fix it!
This website is edited by people like you! Is something wrong or missing? Is something out of date, or can you explain it better?
Please help us! You can fix it yourself and be an official "open source" contributor!
It's easy! See our Beginner's guide to editing the docs.
Page navigation via the keyboard: < >
You can navigate this site via the keyboard. There are two modes:
General navigation, when search is not focused:
- F , S , / : open search dialog
- P , , : go to previous page
- N , . : go to next page
While using the search function:
- Down , Up : select next / previous result
- Esc , Tab : close search
- Enter : go to highlighted page in the results