Setup and Installation
Please use a repository
Because GMC is brand new, you will likely be the first to encounter a scenario or request a feature. Having your project in a repository means that GMC developers can clone and run your game to quickly identify and fix issues, understand your goals, and validate requested features against your code. This is the fastest and smoothest way to make GMC better!
Install MPF 0.80
Before you get working with GMC, you need to install MPF 0.80 by following the MPF Installation Guide.
Upgrade is available
If you already have a working MPF 0.57 installation, you can upgrade to MPF 0.80 with the command pip install --upgrade --pre mpf. However, to maintain the option of reverting back to 0.57 it's recommended to create a new, separate virtual enviroment for MPF 0.80 and install it there.
Download Godot 4
The Godot Media Controller is built on the Godot game engine. Visit https://godotengine.org to download the latest version of the Godot Editor (4.2 or later) and place it wherever you typically keep applications on your machine (not in your game project folder).
After Godot is installed, open the editor and create a New Project. Select your MPF game project folder as the project path, and choose an appropriate render engine.
For most pinball games, Mobile rendering is the recommended balance between performance and featureset. If you plan to do advanced 3D graphics and complex rendering, choose Forward+. If you want to optimize your game to run on very low-powered hardware with limited rendering features, choose Compatibility. Note that you can change this setting at any time, so don't stress about it :)
Finally, in your game project folder create a new folder called addons.
Root project vs GMC subfolder
Some users prefer to create a distinct "gmc" subfolder in their MPF machine folder, and save their Godot project there. This keeps the Godot Editor FileSystem tree cleaner because it's not mixing Godot files with MPF config files, which can make it easier to navigate and maintain.
However, note that Godot only has access to files in its project folder and subfolders. If you choose to make a "gmc" subfolder for your Godot project, all slides, widgets, sound files, and video files will need to be in those respective subfolders in the gmc folder (e.g. /gmc/slides/), NOT in the MPF mode subfolders (e.g. /modes/attract/slides/).
Install the GMC Plugin
Simplest Installation: Godot Asset Library (Coming Soon!)
The Godot editor features a built-in library of plugins that you can download and install with a single click. Unfortunately this library is managed manually by volunteers, and updating plugins can take weeks. Because GMC is changing and improving rapidly every day, it is not yet available on the Godot Asset Library.
Until then, you will need to manually place the GMC plugin into your project addons folder using the Standard or Expert Installation steps.
Standard Installation: Download & Copy
You can download the GMC plugin from the MPF-GMC repository on GitHub. Visit https://github.com/missionpinball/mpf-gmc and click on the green Code button to show the Code dropdown, and select Download ZIP to download the plugin.
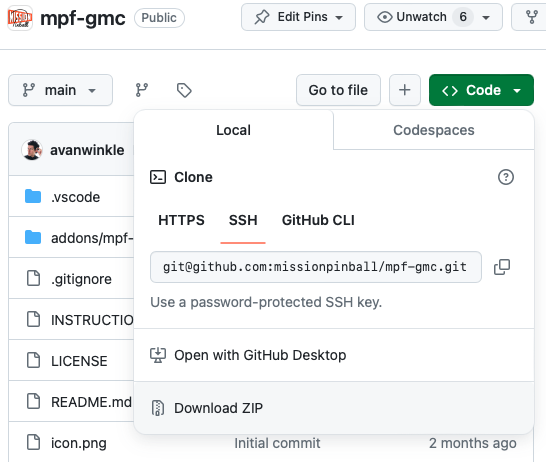
Extract the downloaded ZIP file and go to the addons folder, where you'll see a folder named mpf-gmc. Copy this folder into the addons folder in your Godot project folder.
Manual Updates Required
When downloading and copying GMC in this way, you will need to manually update the GMC to get new features and bugfixes. Just follow the above instructions again and overwrite the addons/mpf-gmc folder to get the newest version.
Expert Installation: Local Repository (MPF-GMC)
For complete control, you can clone the MPF-GMC repository to your computer and run it directly. First, open a terminal window to the directory where you keep your Git repositories, and then clone:
git clone https://github.com/missionpinball/mpf-gmc
You now have a copy of the MPF-GMC source code on your machine, and you need to share it with your Godot project. To update GMC, go to the repository folder in your terminal and type git fetch and git pull.
Option 1: Symbolic Links
A symbolic link is a way to mirror one file or folder in a second location, which makes it easy to keep data synchronized. With a symbolic link from the GMC repository to your project folder, your project will always have the latest changes whenever you pull from the GMC repository.
You will create a symbolic link mpf-gmc in your project /addons folder that points to the mpf-gmc folder in the GMC repository.
Mac & Linux
The syntax is sudo ln -s <path to GMC repository/addons/mpf-gmc> <path to project folder/addons/mpf-gmc>, and will look something like this:
(mpf080) $> sudo ln -s /Users/tommy/git/mpf-gmc/addons/mpf-gmc /Users/tommy/pinballgame/addons/mpf-gmc
When successful, you should see a new mpf-gmc folder in the addons folder you just created. You can confirm that the folder is a symbolic link with the ls -la command, which will show the path that the symbolic link points to.
  (mpf080) pinballgame $> ls -la addons

  total 0
  drwxr-xr-x    96 Apr  8 19:09 .
  drwxr-xr-x  1024 May  6 12:30 ..
  lrwxr-xr-x    41 Apr  8 19:09 mpf-gmc -> /Users/tommy/git/mpf-gmc/addons/mpf-gmc
Windows
The syntax is mklink /d <path to project folder/addons/mpf-gmc> <path to GMC repository/addons/mpf-gmc> and will look something like this:
(mpf080) $> mklink /d "C:\repos\pinballgame\addons\mpf-gmc" "C:\repos\mpf-gmc\addons\mpf-gmc"
Option 2: Copy the MPF-GMC Folder
If you do not create a symbolic link, you can manually copy the mpf-gmc folder from the GMC repository /addons folder to your project addons folder. You'll know it's in the right place if your project root (in this example, "pinballgame") has the file path /pinballgame/addons/mpf-gmc/plugin.cfg.
The downside of copying the folder is that you will need to manually re-copy the folder each time you download a new update to the GMC.
Keeping MPF-GMC Up-To-Date
MPF-GMC is in active development and changes frequently, including new features, fixes, and other changes. In order to ensure that you are experiencing the latest and greatest, please ensure that you periodically run the following commands to get the changes to both projects. Once they are pulled into your local copy, you will immediately have access to the new features in building your game.
If you downloaded MPF-GMC as a ZIP file from GitHub, follow those steps again and replace the old addons/mpf-gmc folder with the newly downloaded one.
If you cloned the MPF-GMC repository, you need to fetch and pull:
  (mpf080) ~/git $> cd mpf-gmc
  (mpf080) ~/git/mpf-gmc $> git fetch
  (mpf080) ~/git/mpf-gmc $> git pull
Symlink Users: If you are using a symlink to mirror the mpf-gmc folder in your project addons folder, the above steps are enough.
Copy+Paste Users: If you have copy+pasted the mpf-gmc folder from the GMC repository to your project addons folder, you will need to re-copy+paste the folder after you fetch and pull.
Because of how Godot processes and caches plugins and autoloads, sometimes pulling a fresh update of GMC will trigger errors and warnings in the Godot log. This is expected the first time you open your project in Godot after a GMC update. You can use the Project > Reload Current Project menu to refresh the Godot editor and clear out errors after updating.
In Case of Catastrophe
In some cases, a godot project can get corrupted with cached variants of GMC autoload/class files that cause a slew of errors on startup, even after restarting the editor.
In these rare cases, exit the editor and from the Project List, remove your project from the list of saved projects. Then in your project folder delete the /.godot folder and re-import your project.godot file into the Project List.
Activate the GMC Plugin
There will be errors
During this step, at various points some pieces will be setup before others and Godot will present errors about files not found or scripts unable to be parsed. It is safe to ignore these errors for now: we will restart Godot after this step and everything will be in order.
In the Godot Editor, open the Project > Project Settings menu and select the Plugins tab. You should see an option there for Godot MC, check the checkbox to enable the plugin.

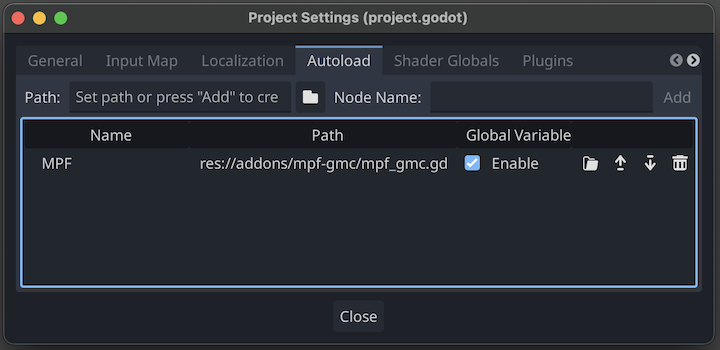
Now go to the Autoload tab and click the folder icon to select an Autoload script. Navigate to the addons/mpf-gmc folder and choose the file mpf_gmc.gd. Under Node Name set the name to "MPF" (all caps) and press Add. You should see a new line appear with a checkbox enabled.
Warning
Godot exposes autoloads by the given Node Name, and various components of GMC reference one another by the name "MPF". When adding the mpf_gmc.md autoload, you must set the Node Name to MPF or the GMC will not function.
Close the Project Settings menu, save the project, and restart Godot.
You can now proceed to your project setup!
Something missing or wrong? You can fix it!
This website is edited by people like you! Is something wrong or missing? Is something out of date, or can you explain it better?
Please help us! You can fix it yourself and be an official "open source" contributor!
It's easy! See our Beginner's guide to editing the docs.
Page navigation via the keyboard: < >
You can navigate this site via the keyboard. There are two modes:
General navigation, when search is not focused:
- F , S , / : open search dialog
- P , , : go to previous page
- N , . : go to next page
While using the search function:
- Down , Up : select next / previous result
- Esc , Tab : close search
- Enter : go to highlighted page in the results