How to use MPF with WPC machines
You can use MPF to control existing Williams / Bally / Midway WPC, WPC-S, and WPC-95 pinball machines.
1. Connecting the physical hardware
You can use a FAST Pinball Retro Controller or P-ROC to interface with an existing WPC machine.
In all cases, you remove the existing MPU board from the backbox of your machine and replace it with the new controller. You then connect up all the existing cables and connectors to the new controller, so in effect the new WPC controller becomes the new MPU of your machine.
A few notes:
- Both the P-ROC and the FAST Retro controller have USB connections on them, and the actual "code" that makes up MPF runs on a computer which remotely controls the pinball controller (and therefore the machine)
- Switch connectors are connected directly to the P-ROC or FAST Retro controller.
- Drivers, coils, lamps, and GI are controlled via the existing WPC power driver board (which is connected to the P-ROC or FAST Retro controller via the existing 34-pin ribbon cable).
- The existing WPC sound board in the backbox is not used, as sounds are generated via the computer running MPF. There are articles online showing how you can modify the existing sound board to add a headphone plug you can connect into the computer running MPF, though most people end up replacing the speakers with new ones and a more powerful and better sounding amp. This means you can remove the existing sound board from the backbox.
- The existing DMD, if you choose to use it, is unplugged from the WPC DMD driver board and instead plugged into a 14-pin header on the P-ROC or FAST WPC controller. This means you can remove the existing DMD driver board from the backbox.
For the P-ROC, connect your machine according to the P-ROC connector mappings.
FAST Pinball Retro controller instructions are available on their site.
More technical information can be found in the PinWiki Williams WPC page.
2. Configuring MPF for WPC machines
In order to use MPF in a WPC machine, you need to configure the
driverboards: section of your hardware platform.
If you're using a FAST WPC controller, it will look like this:
hardware:
  platform: fast
fast:
  driverboards: wpc
And if you're using a P-ROC:
hardware:
  platform: p_roc
p_roc:
  driverboards: wpc
Note that with the P-ROC, it is very important that you specify
driverboards: wpc in your config if you're using a WPC machine. The
reason for this is the P-ROC can be used to control either PD-16 (the
P-ROC driver boards) or WPC driver boards, but the polarity of each type
is the inverse of the other.
In other words, if you put a P-ROC in a WPC machine but specify
driverboards: pdb, when you run MPF, it will disable all the drivers,
but since the polarity is reversed, it will actually enable every driver
in your machine at once. This will (1) be very loud and cause you to
jump back about 10 feet, and (2) blow all your fuses.
3. Configuring switches
When using MPF with WPC machines, you can use the switch numbers from the machine's operator's manual. The exact format depends on the type of switch:
Matrix switches
Matrix switches start with the letter S, followed by the switch
number. For example:
switches:
  s_left_slingshot:
    number: s41
  s_right_jet:
    number: S45
Note that the "S" is not case-sensitive.
Switch numbers in WPC machines correspond to the column and row, so switch "11" is column 1, row 1, switch "26" is column 2, row 6, etc. This means that there are no 0s or 9s in a standard 8x8 switch matrix.
Also, some WPC-95 machines have a 9th column in the switch matrix (meaning they'll have switch numbers 91-98). In this case, just enter those switch numbers like normal, and MPF will notice that there are switch numbers in the 90s and automatically configure the controller hardware to use the 9th column.
Our experience with using MPF with many different WPC machines is that many times, the switch numbers in the operator's manual are incorrect. (We see this in many 25% of WPC machines.) Usually it's the case where two switches have been swapped, though sometimes there are unused switches that really are used and vice-versa. So if you don't get switch activities that you expect, check out neighboring switches to see if the numbers are wrong.
Direct switches
Direct switches (which are typically the coin and front door switches)
are entered with the SD prefix, then the number, like this:
switches:
  s_left_coin:
    number: sd1
  s_enter:
    number: SD8
Again, case doesn't matter.
Fliptronics switches
Fliptronics switches (on machines that have them) are entered with the
SF prefix.
There are 8 Fliptronics switches on machines with Fliptronics. Typically four of them are used for flipper buttons, and four are used for EOS switches. (The flipper buttons on most Fliptronics machines actually have two switches stacked together behind each flipper button. If you push the flipper button part way in, the switch connected to the lower flipper engages, and if you push the button the rest of the way in, the switch connected to the upper flipper engages. This means if you're good, it's technically possible to flip just the lower flipper without flipping the upper one (or it's possible to hold a ball on the lower flipper while flipping the upper one).
That said, some machines needed a few extra switches for other things, and if they don't have four flippers, it's possible that the extra Fliptronics switches are used for other things.
You would use Fliptronics switches in your config like this:
switches:
  s_flipper_lower_right_eos:
    number: sf1
  s_flipper_lower_right:
    number: sf2
    tags: player, right_flipper
  s_flipper_lower_left_eos:
    number: sf3
  s_flipper_lower_left:
    number: sf4
    tags: player, left_flipper
4. Configuring coils & drivers
The drivers section of your WPC machine's operators manual will list
all the driver numbers as well as the devices they're attached to. Note
that WPC machines use drivers for coils, motors, and flashers. You only
enter your coils and motors in the coils: section of your config.
Flashers go in the flashers: section (discussed below).
Configuring regular coils
To configure the regular coils (from the "Solenoid / Flasher" table in
your machine's operator's manual, enter the letter C followed by the
solenoid number, like this:
coils:
  c_trough_eject:
    number: c01
    default_pulse_ms: 25
  c_bottom_popper:
    number: c02
    default_pulse_ms: 25
  c_plunger_lane:
    number: c03
    default_pulse_ms: 25
Fliptronics coils
You'll also see a section in the solenoid table in your ooperator's manual with "Flipper Circuits", like this:
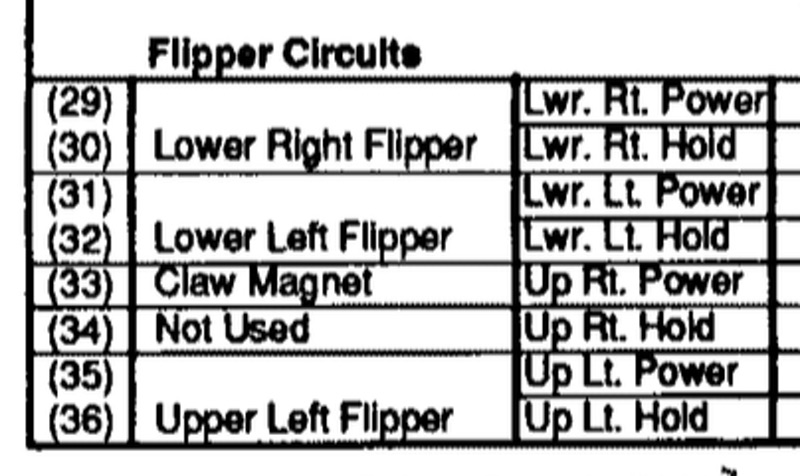
That section shows the 8 driver outputs that are connected to the Fliptronics board (if your machine has one).
For those coil numbers, you can either enter C followed by the number,
or the four-letter code indicating which output the driver is connected
to, like this:
c29orFLRM- Lower Right Main (Power)c30orFLRH- Lower Right Holdc31orFLLM- Lower Left Main (Power)c32orFLLH- Lower Left Holdc33orFURM- Upper Right Main (Power)c34orFURH- Upper Right Holds35orFULM- Upper Left Main (Power)s36orFULH- Upper Left Hold
Many machines do not use all eight of these, and many machines also connect Fliptronics coils up to other random things (typically magnets and diverters).
An example in your config might be:
coils:
  c_flipper_left_main:
    number: fllm
    default_pulse_ms: 30
  c_flipper_left_hold:
    number: fllh
    allow_enable: true
  c_flipper_right_main:
    number: flrm
    default_pulse_ms: 30
  c_flipper_right_hold:
    number: flrh
    allow_enable: true
  c_vanish_magnet:
    number: c35
    allow_enable: true
  c_loop_post_diverter:
    number: c36
    allow_enable: true
5. Configuring lights (lamps)
Lights are configured with the letter L followed by the lamp number
from the manual:
lights:
  l_ball_save:
    number: l11
    subtype: matrix
  l_fortress_multiball:
    number: L12
    subtype: matrix
  l_museum_multiball:
    number: L13
    subtype: matrix
  l_cryoprison_multiball:
    number: l14
    subtype: matrix
  l_wasteland_multiball:
    number: L15
    subtype: matrix
  l_shoot_again:
    number: l16
    subtype: matrix
See lights: and light_player: for details on how to use them.
5. Configuring GI (general illumination)
GI strings are configured with G followed by the number, like this:
lights:
  gi_back_panel:
    number: g01
    subtype: gi
  gi_upper_right:
    number: g02
    subtype: gi
  gi_upper_left:
    number: g03
    subtype: gi
  gi_lower_right:
    number: g04
    subtype: gi
  gi_lower_left:
    number: g05
    subtype: gi
See lights: and light_player: for details on how to use them.
6. Configuring flashers
Since flashers in WPC machines are technically drivers (coils), they are
also configured with the letter C followed by their number similar to
coils.
coils:
  f_claw:
    number: c17
  f_jets:
    number: c21
  f_side_ramp:
    number: c22
  f_left_ramp_upper:
    number: c23
  f_left_ramp_lower:
    number: c24
See flashers: for details on how to use flashers.
Something missing or wrong? You can fix it!
This website is edited by people like you! Is something wrong or missing? Is something out of date, or can you explain it better?
Please help us! You can fix it yourself and be an official "open source" contributor!
It's easy! See our Beginner's guide to editing the docs.
Page navigation via the keyboard: < >
You can navigate this site via the keyboard. There are two modes:
General navigation, when search is not focused:
- F , S , / : open search dialog
- P , , : go to previous page
- N , . : go to next page
While using the search function:
- Down , Up : select next / previous result
- Esc , Tab : close search
- Enter : go to highlighted page in the results